
Category Archives: Uncategorized
Happy Birthday TRS-80!

Today, August 3rd, is the 41st anniversary of the release of the Tandy / Radio Shack TRS-80 personal computer, originally released back in 1977 (Tandy was a leather company of all things, and bought out Radio Shack WAY back in 1962 – TRS is an acronym for Tandy Radio Shack). I have a personal place in my heart for this particular machine, the Model III specifically which is shown in the header image, but the whole line, which included pocket-sized, handhelds, portables, luggables, and multiple desktop models over the years, is easily one of my favorites.
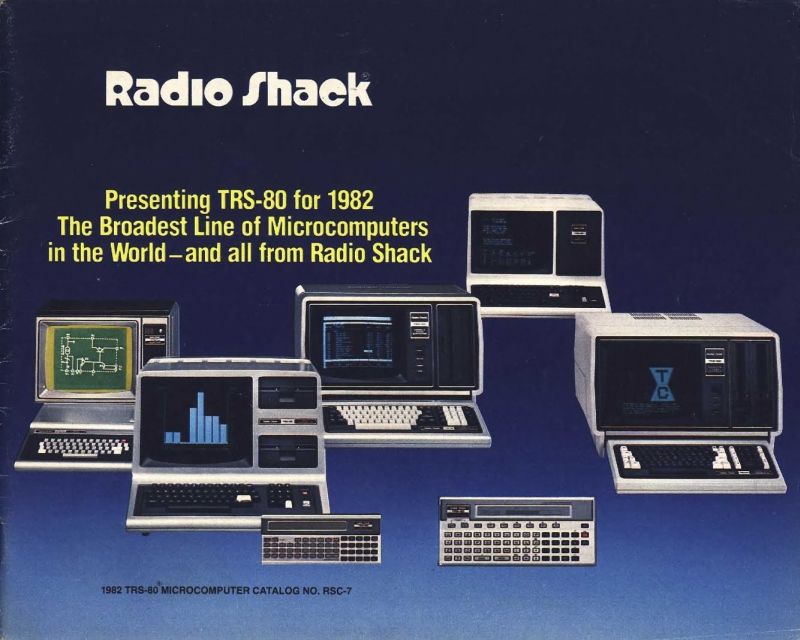
TRS-80 model line (for 1982, anyway)
You see, there is a trinity of devices and systems in the history of computing that just give me chills when I think about them, and along with the Commodore PET and Apple IIe, the TRS-80 is one of them. Although it wasn’t the first true PC I ever used – that would be the PET – it was the first on which I had significant exposure to what a machine could do. It was the machine of choice for a computer summer camp – don’t judge! – that I attended while but a wee lad. Using cassette tape as magnetic storage via an external cassette player often also bought at Radio Shack, we learned about computers and programming and wrote programs in line-number BASIC. They weren’t terribly sophisticated, but even at that young age, I managed to write a text-based adventure game in which you explored a haunted house solving what I thought were pretty well-thought out puzzles: I was most proud of the skeleton who was willing to help you, but only if you retrieved his missing golden-ringed femur which had been stolen by a dog – a golden retriever. I’m STILL proud of that one.
Even though it was colloquially referred to back then as the “Trash-80,” showing that system wars have existed for far longer than anyone would imagine, it was a surprisingly robust machine. Being the pre-GUI era, and even the pre-OS era, like the PET it came only with BASIC pre-loaded; there was no true operating system. An attempt was made to address that with the later release of TRS-DOS, although even that wasn’t a true operating system; it was merely a limited expansion of the capabilities of BASIC. The most efficient thing to do if you wanted to run programs was to buy them on cassette and load them into memory via the play button on a standard cassette player. If you wanted to save a program you wrote, you’d use the record function, but be sure to skip past the leader tape (a mistake I made once and never again).
Oh, did I mention that much of the system code for the TRS-80 was written by Bill Gates? It’s true! In fact, here’s a neat side-by-side of Bill Gates and Microsoft co-founder Paul Allen in 2013, recreating a famous photo originally taken in 1981, in which they are surrounded by, among other things, an Apple, Commodore Pet, and TRS-80! These images were taken from a Forbes article about the event that’s interesting reading.
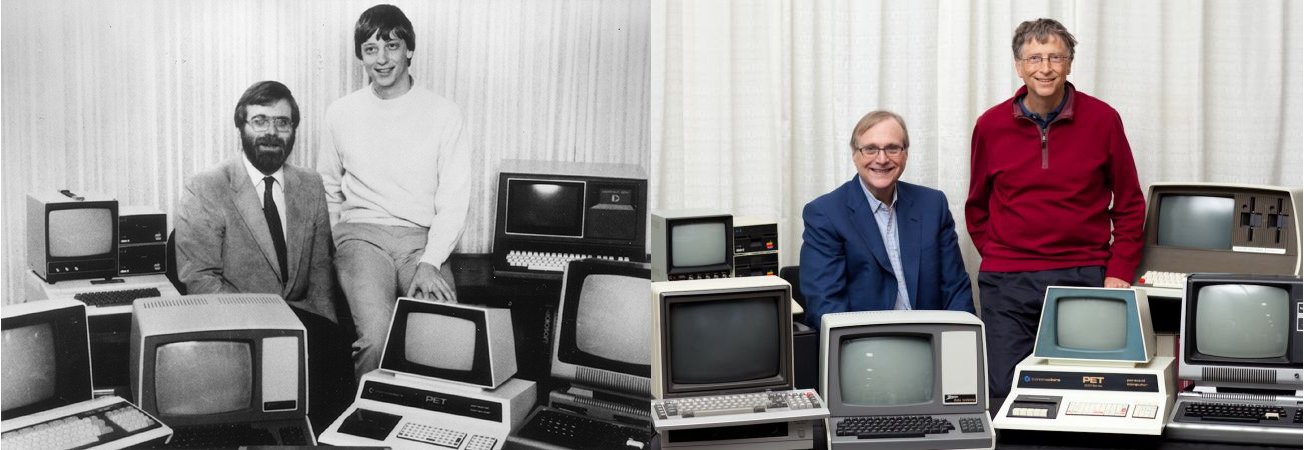
Bill Gates and Paul Allen
Versions of the TRS-80 were released and in operation up until around 1991, which is a pretty good lifespan for a PC line, especially one that was never considered much competition for the other powerhouse lines from Commodore, with the C64 still being the most successful personal computer ever made, or Apple, a company that’s still so successful it just became the first to have a trillion-dollar valuation. Meanwhile Radio Shack, a chain that could at one time claim 95% of the US population lived within three miles of one of its stores, sadly closed down permanently in 2017.
Even so, the time in my life it represents, the sheer force of discovery it provided, the capabilities it displayed, the potential it showed, the experiences it allowed, even now as I get older it provides an incredible rush of nostalgia and reminds me of the excitement I felt for technology as it was a new and exciting thing in the consumer space. I don’t feel it so much these days, but at least there’s something that provides such a reminder.
I am also happy to announce that there is a fully-functioning Windows-based TRS-80 emulator, Sharp-80. It works amazingly well and shows exactly what kind of interfaces and accessibility we had to work with back then. Be warned: It’s fun to use and of course I’ve spent a long time with it reminiscing about the bad old days, but it’s also not for the faint of heart, and if you’ve been raised in the coddled, cushioned world of GUIs, you’ll be in for a shock. A wonderful, text-based shock.
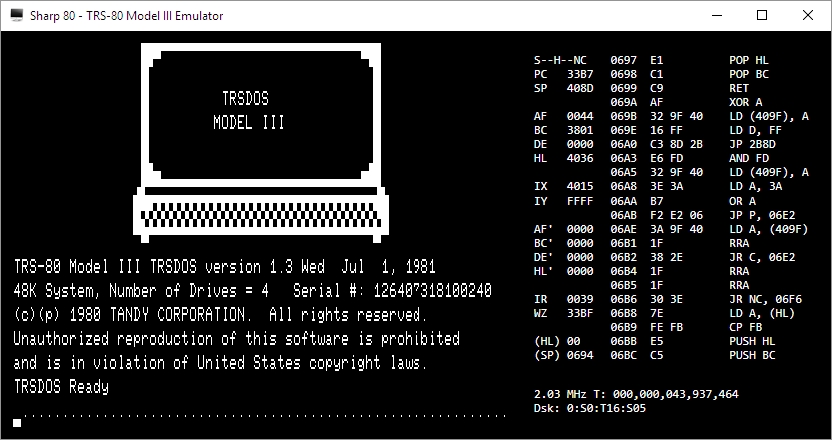
Sharp-80 emulator
Happy birthday TRS-80, and thanks for everything. I’ll always remember.
Just like old times: Running console emulators and PLEX on the virtual flat screen TV in Oculus Home
A couple of months ago, Oculus introduced a few flat-panel TVs (and a desktop monitor) into Oculus Home. That would have been fine in and of itself, however these TVs can have ‘panels’ embedded into them. Panels are essentially windows from your desktop, so if you had Word or Plex or chat or even a game session open, you could have it appear in a TV or monitor in your virtual home.
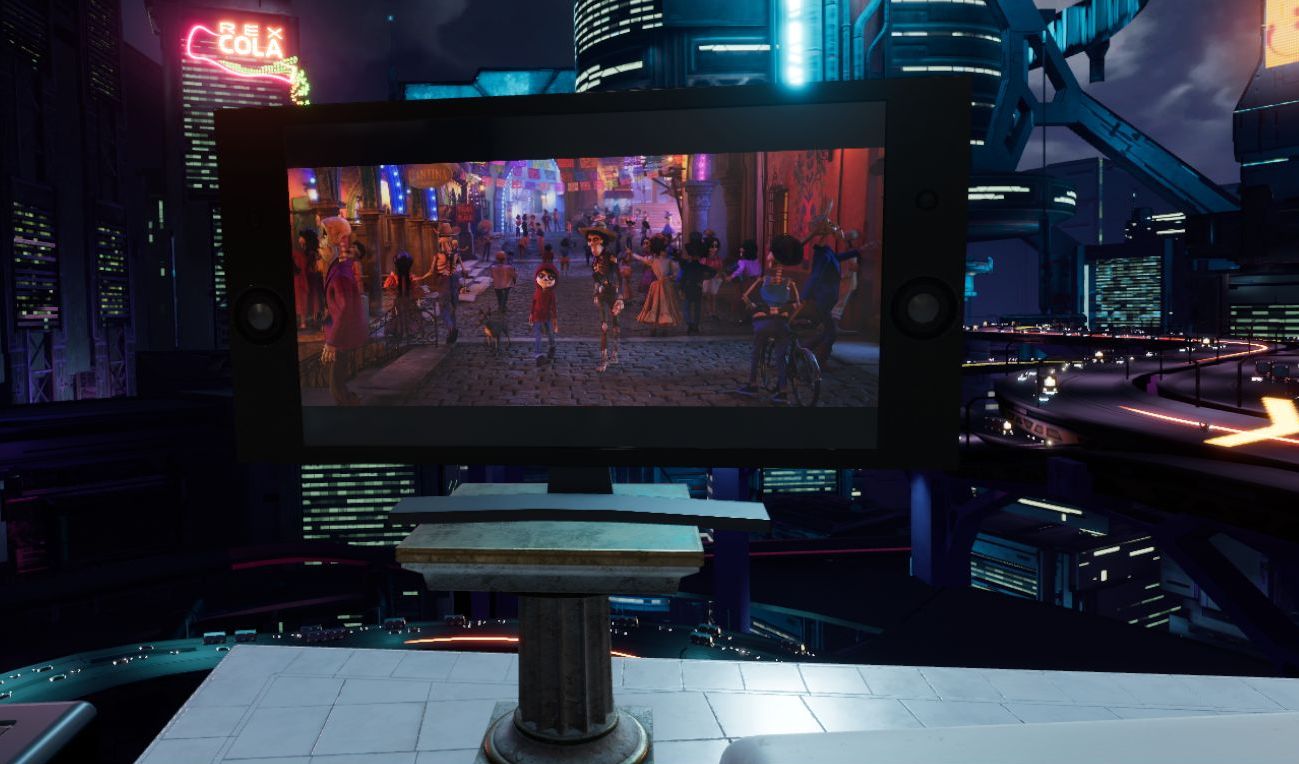
Naturally, my first instinct was to fire up one of my retro-console emulators and see if I could have it run by projecting it through one of the TVs in the virtual space. It’s almost a meta thing: Playing a classic console on a flat-screen TV in a virtual environment via VR. If it worked, since Oculus allows you to place as many of these as you wish, I could set up the custom gaming room of my dreams. I am happy to report it worked perfectly, and I am in the process of designing that gameroom right now! I’m thinking futuristic city as the backdrop, but we’ll see.
PLEX, which is movie-playing and streaming software for your personal media collection, also ran beautifully with no lag, and I’ll talk a little about that towards the end.
Before I get to the results, let’s talk about emulators. Emulators trick your system into thinking they’re the console they’re emulating, and I mean that they really trick it. Whatever shortcomings the console itself had, so will the emulator (and possibly a few more, but we’ll get to that). If a bug appeared in a game, or the console just quite wasn’t fast enough to push a game, that will be replicated during emulation. Atari 2600 emulators will even show racing the beam errors, in which the next line of video won’t be drawn if the emulator is still carrying out logic operations. In the following image, which shows The Empire Strikes Back for the Atari 2600 running in the Stella emulator (Stella was the code name for the console during development), if you look closely you’ll see black lines down the left hand side of the image: Those are racing the beam errors, even though it’s not a CRT and not even a console! The point is, when you’re emulating, the systems is the console.
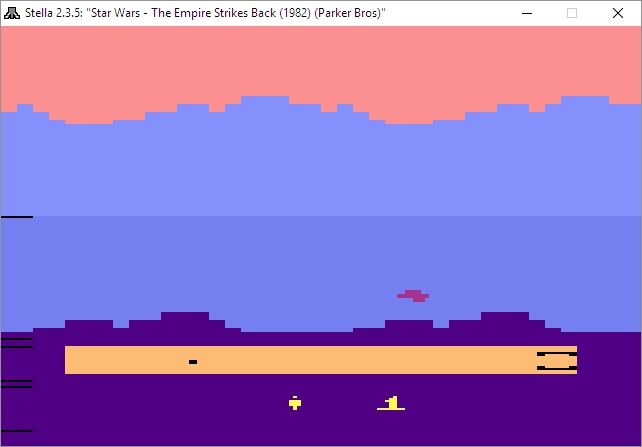
Racing the Beam errors in the Stella emulator
Not only that, the games are actually the games, not some reprogrammed nonsense. An ISO, for example, is an exact bit-level copy of digital media, so someone will put the original game disc into their PC’s optical drive, or sometimes they’ll use the console itself with special connections, and use special software to turn that disc or cart into a file. Other times, the ROM chip itself will have to be ripped using a ROM (EEPROM) burner.
The point is, with an emulator, you’re getting the actual console experience with the actual games and all their flaws or lack thereof, not some hokey recreation. It also means some games may not work all that well, or at all, but that’s rare.
Generally, emulators are not terribly difficult to set up and get running. Each has its own quirks, but once you start experimenting you’ll be hooked, not to mention surprised at (generally) how well they run.
I use many emulators, and I’ll give you a crash course on setting them up. All you really need to know is that you need to specify a folder that contains your games, and you can call the folder anything you want: Whenever I set up a folder I’ll call it either ‘Games’ ‘ROMs’ or ‘ISOs,’ but you can use anything. Speaking of the games, those files can come in several forms: Some emulators allow for zip files in the games folder, others will require an .iso, .bin, or possibly other, specific file such as .gcn which is for the Nintendo GameCube. Some can use whatever you throw at them. Additionally, for the later consoles, you’ll need a BIOS file in your games folder as well, and they can generally be found with a low-effort web search, as can the games themselves.
Here’s an example of how the directories work, and these are almost always assigned during setup, although you can certainly set it through the options as well. For clarification, I run mine from a network drive, which is nice because I can save a game and then pick it up again from any PC in the house, or on the planet. Speaking of game saves, the emulators take care of setting up memory cards for saving games as well, however you can also create ‘Save States’ at any point in a game regardless of how its save structure is set up. So if you have to leave or otherwise shut down the emulator but haven’t reached a checkpoint, you create a save state, then load that instead of the save from within the game itself. You’re essentially saving the state of the emulator, not the game.
Here’s an example of setting up the games directory: In the image below, in image ‘1’ in the upper left, you can see I have an ‘Emulators’ folder, and after opening that, in image ‘2,’ top right, I am selecting the PCSX2 folder, which is a PlayStation2 emulator. Then, in image ‘3,’ lower left, I have created a folder called ‘Games’ where I keep all game files, and finally the last image shows the .iso and .bin files that represent that games I have for that emulator. On the other hand, my Gamecube / Wii emulator, Dolphin, has a folder called ISOs where I keep all my games, even though not all of them are actually .isos.
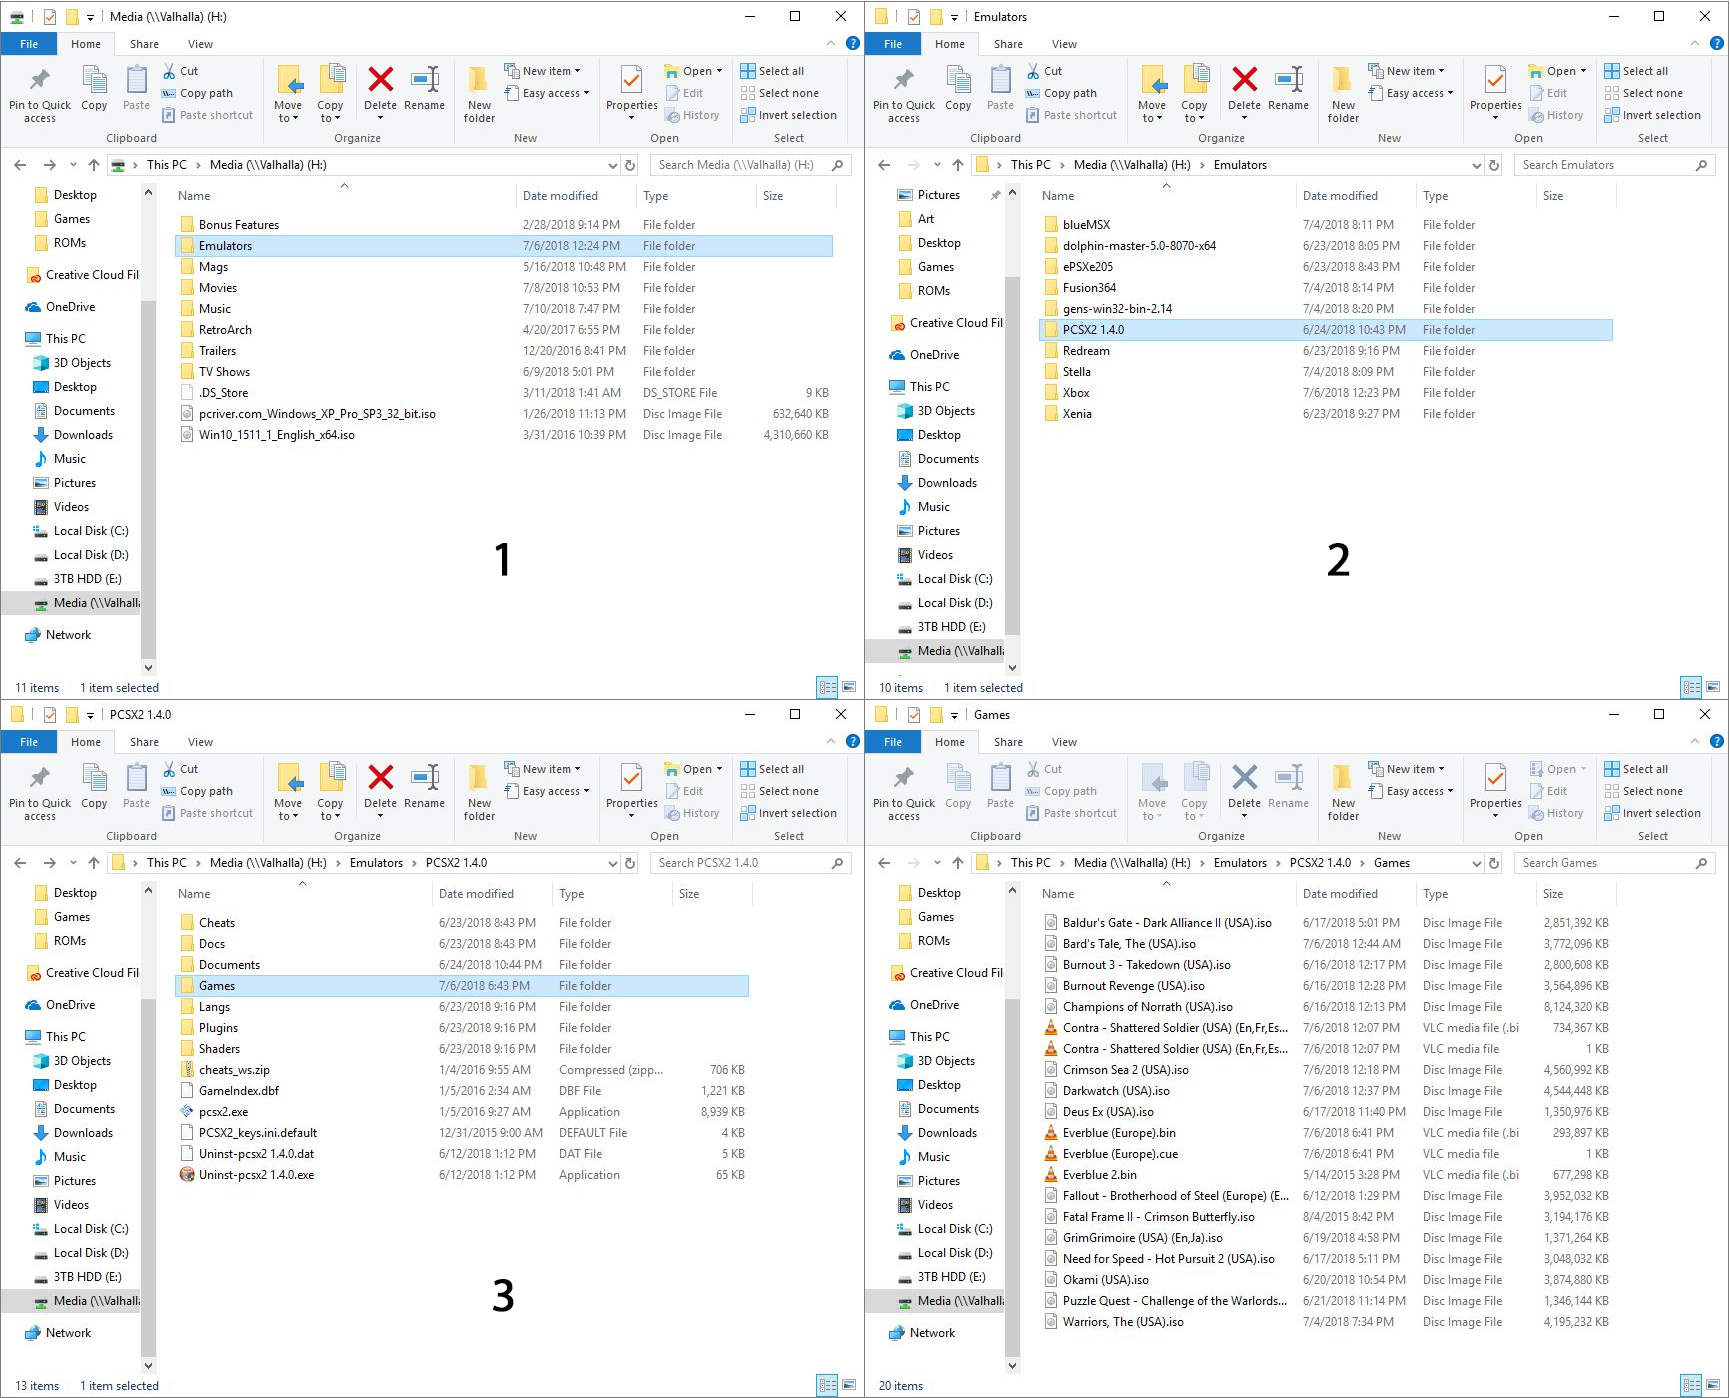
Directory structure for the PCSX2 emulator
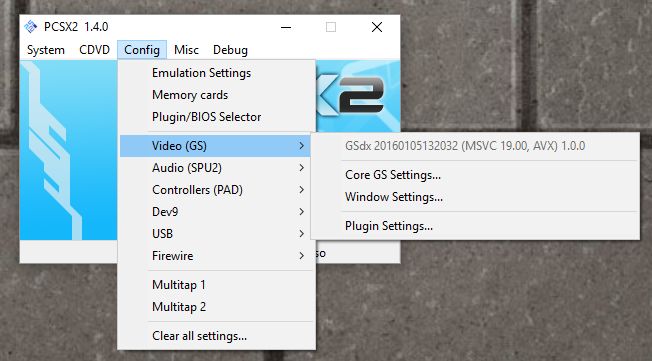
The next big thing is that I have an XBox One controller connected to my PC, and any controller you use has to be configured. The initial controller setup, although straightforward, can be moderately time-consuming, but you should only have to do it once. For most emulators, you’ll need to go through and indicate which button on the controller does what, and you do that by clicking on each function in the emulator, then pressing the button / pulling the trigger that you’d like to assign. Below are images of the PCSX2 controller configuration screen, and underneath that the Dolphin controller configuration screen, and you have to click on each function then press / pull the corresponding control on the controller itself. Once that’s done, controls should be all set. Ultimately, it’s a really nice way of doing it because you can set the controllers any weird, wacky way you’d like.

PCSX2 Controller Configuration dialog

Dolphin Controller Setup
The only other major issue you are likely to run into is the graphical settings. Older consoles weren’t designed with 4K TVs in mind, many never even considered widescreen! Although most games will work fine, each emulator will have its own peculiarities when it comes to this, and they all offer EXTENSIVE graphics customization. PCSX2, for example, allows you to use OpenGL, Direct3D9 or Direct3D11, and it’s fascinating how a game won’t run under DX9, but will run perfectly under DX11, or vice versa, and I have seen many variations on that. I also, for that particular emulator, set resolution to at least 2x native; then it will run surprisingly well even on a widescreen 4K TV. And of course, it allows you to customize graphics for the emulator in general, as well as specific tweaks for the renderer you choose.
PCSX2 configuration menu

PCSX2 renderer selection and tweaking
When it comes to actually selecting a game, some emulators are more user-friendly than others. Prettier, I guess I should say. PCSX2 only offers up a straight file selection window, while Dolphin and ReDream, a Dreamcast emulator, provide lovely selection menus. Being an HCI person I prefer that, but the PCSX2 barebones method works just as well.
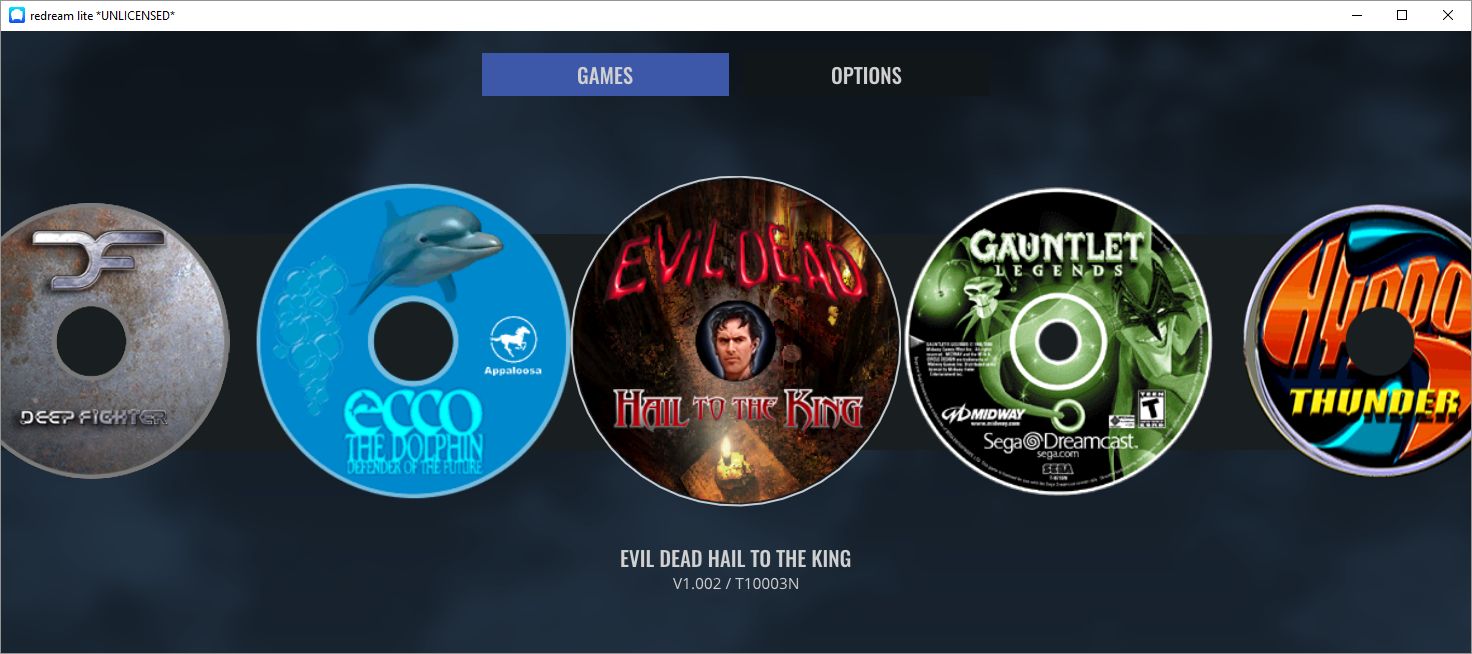
ReDream game browser

Dolphin game browser
So now that we have the details out of the way, what about running them on the TVs in Oculus home? I’m glad to report it works perfectly! There is, however, one big caveat: You can choose to embed the emulator window that’s displaying the game, however the window won’t be listed as a panel if it’s fullscreen, so you’d have to window the emulator on the desktop, then embed the window, then maximize it on the desktop. The better choice is to fullscreen the emulator window then embed the desktop itself. If you do that, it will work perfectly, with no lag (either visual or input), no jitter, no performance hit. For PLEX and even for a couple of emulators, if they’re fullscreen, Oculus Home won’t recognize them anyway so you’ll have to embed the desktop no matter what: It’s just a better all-around option.

Panel selection
It also works for running MAME through the arcade cabinet, as seen below:
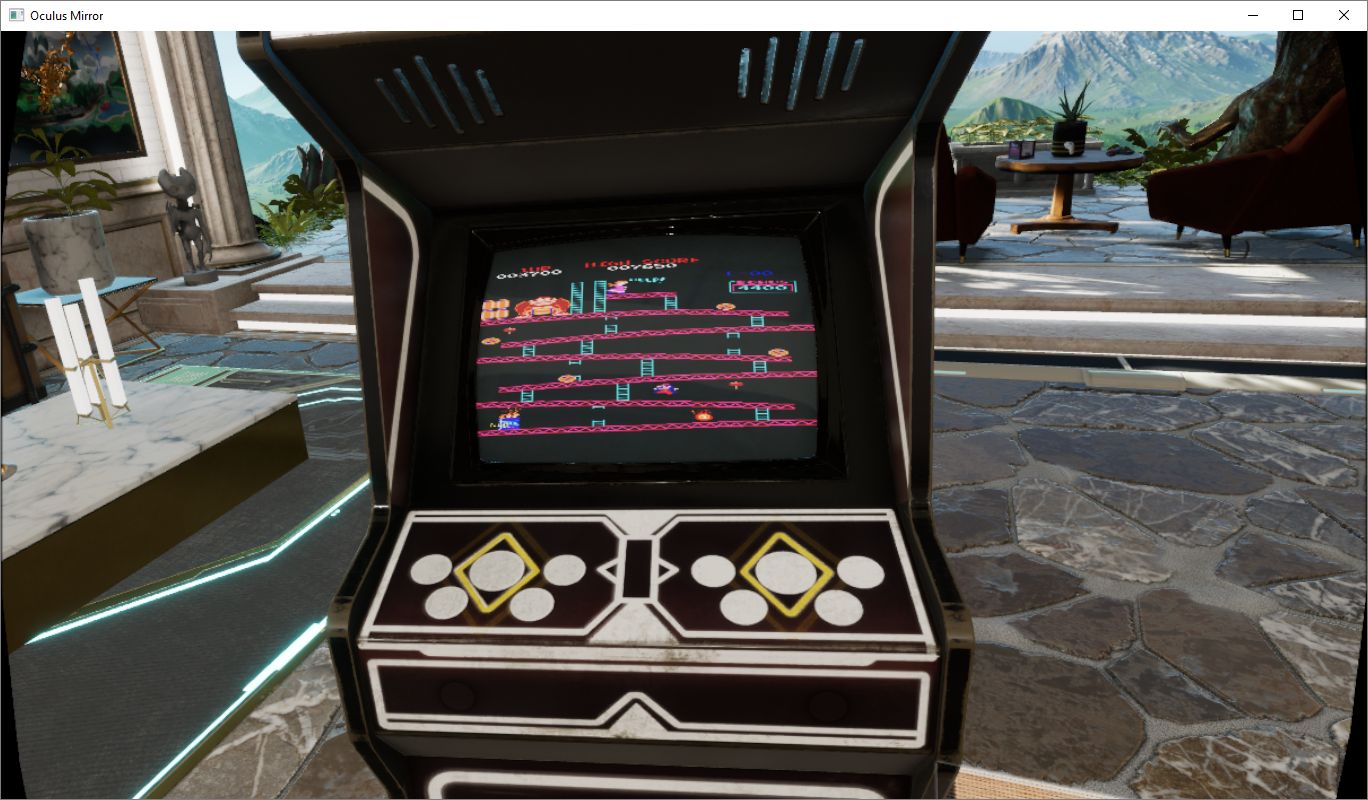
Running MAME in the arcade cabinet
If you’re interested in running PLEX, I have a separate video series on ripping videos and setting up PLEX (part 1 (Ripping), part 2 (PLEX)), and while it’s also not difficult, it’s beyond the scope of this post. Even so, the process of embedding is the same, especially since, as mentioned earlier, PLEX doesn’t show up in the panel selection menu anyhow.
Here’s the video showing four different emulators running on the Virtual TV in Oculus Home, as well as PLEX running a streaming rip of Coco from a network drive, and there is also a wall-mounted TV option along with a computer monitor. It all worked incredibly well, much better than expected.
Uh-Oh. Some Samsung phones randomly sending Gallery pics to random people. Randomly.

If you have a Samsung phone, and especially if you are on the T-mobile network, you may want to get ready: there are reports that these phones are randomly sending random pictures from the phone’s image gallery to random people in the phone’s contact list. There are obviously many scary parts to this: Not only is every aspect of it random, including when it happens, what gets sent, and to whom, but there is also no record of the images being sent. So you won’t know it happened until you get a seemingly out-of-nowhere text message from that person you went on one date with telling you to stop sending pictures of your dog dressed up like a minion.
It’s happening only with Samsung’s default messaging app, and the apparent reason it’s happening is carriers are upgrading their services to include what’s known as Rich Communication Services, a framework that is intended to replace SMS, otherwise known as simple messaging service, or the bog-standard text apps we use today. There are many reasons to implement a new platform, the two most prominent being SMS has limited functionality and it has a file size restriction os 2MB for attachments. Considering we send over a trillion text messages a year, it’s understandable demand would be there for something with more capabilities, if not necessarily better, than what it is we are using right now. Not to mention, the original incarnation of SMS was developed all the way back in the ’80s!
But wait – if it has all these additional capabilities, then it would necessarily be better, right? Well, that’s where I’m not so sure. Some of the features the RCS includes are the ability to share your location with contacts and indicate whether or not a message has been read. We already have issues with people expecting immediate responses to text messages, and I feel that capability of seeing when a message is read or even if a person is typing a response is going to lead to a whole new level of negative interpersonal dynamics, especially if they can see where you are! On the other hand, if it can incorporate all the features of other messaging apps in a single application, including things like group chat and video calls, then there are advantages to that as well, I suppose.
Additionally, not all incarnations of RCS are compatible, meaning the one that works on a Verizon phone won’t work on a T-mobile phone, and T-mobile is one of the big supporters of this new protocol, although all carriers are on board to varying levels of commitment. I suspect we’ll see that changing very soon as I believe RCS will become the new standard.
I know my phone has it, because I now have a permanent message on my phone’s lock screen and notification tray to set up WiFi calling, which is another feature of RCS. I haven’t done that because I don’t need WiFi calling, it serves absolutely no purpose (for me anyway, because I have unlimited calling), but that screamed out “You have RCS now!” Speaking of which, I’ve been thinking for a couple of months about joining the dark side and switching to iPhone, which doesn’t have RCS at all but has a much more feature-rich messaging app to begin with, one that already incorporates many of the features RCS is attempting to implement.
If you are concerned, the easy solution is use a different texting app rather than the Samsung default. I’ve done that for a long time, specifically Textra – it has a lot of additional functions that I rarely use but are nice to have when I do. There are many apps to choose from, though, and I’m sure you can find one to suit your needs. You should also turn off all permissions to the default app, regardless of whether you use it or not. I don’t have anything to hide in my phone’s image gallery (really, I don’t), but the idea of random images being sent is just too weird. I turned off permission for not only Samsung’s default messaging app, but Verizon’s as well.
If you’re REALLY concerned, Samsung has a secure folder feature. Time to move those…pics. YOU know the ones I mean.
DigiTech RP360 XP: The best effects pedal I’ve ever used

I don’t often have the opportunity to talk about music gear on this site, so today is doubly exciting as I not only get to do that, but I get to present what is easily the best effects pedal I have ever used – and I’ve used a lot – the DigiTech RP360 XP.
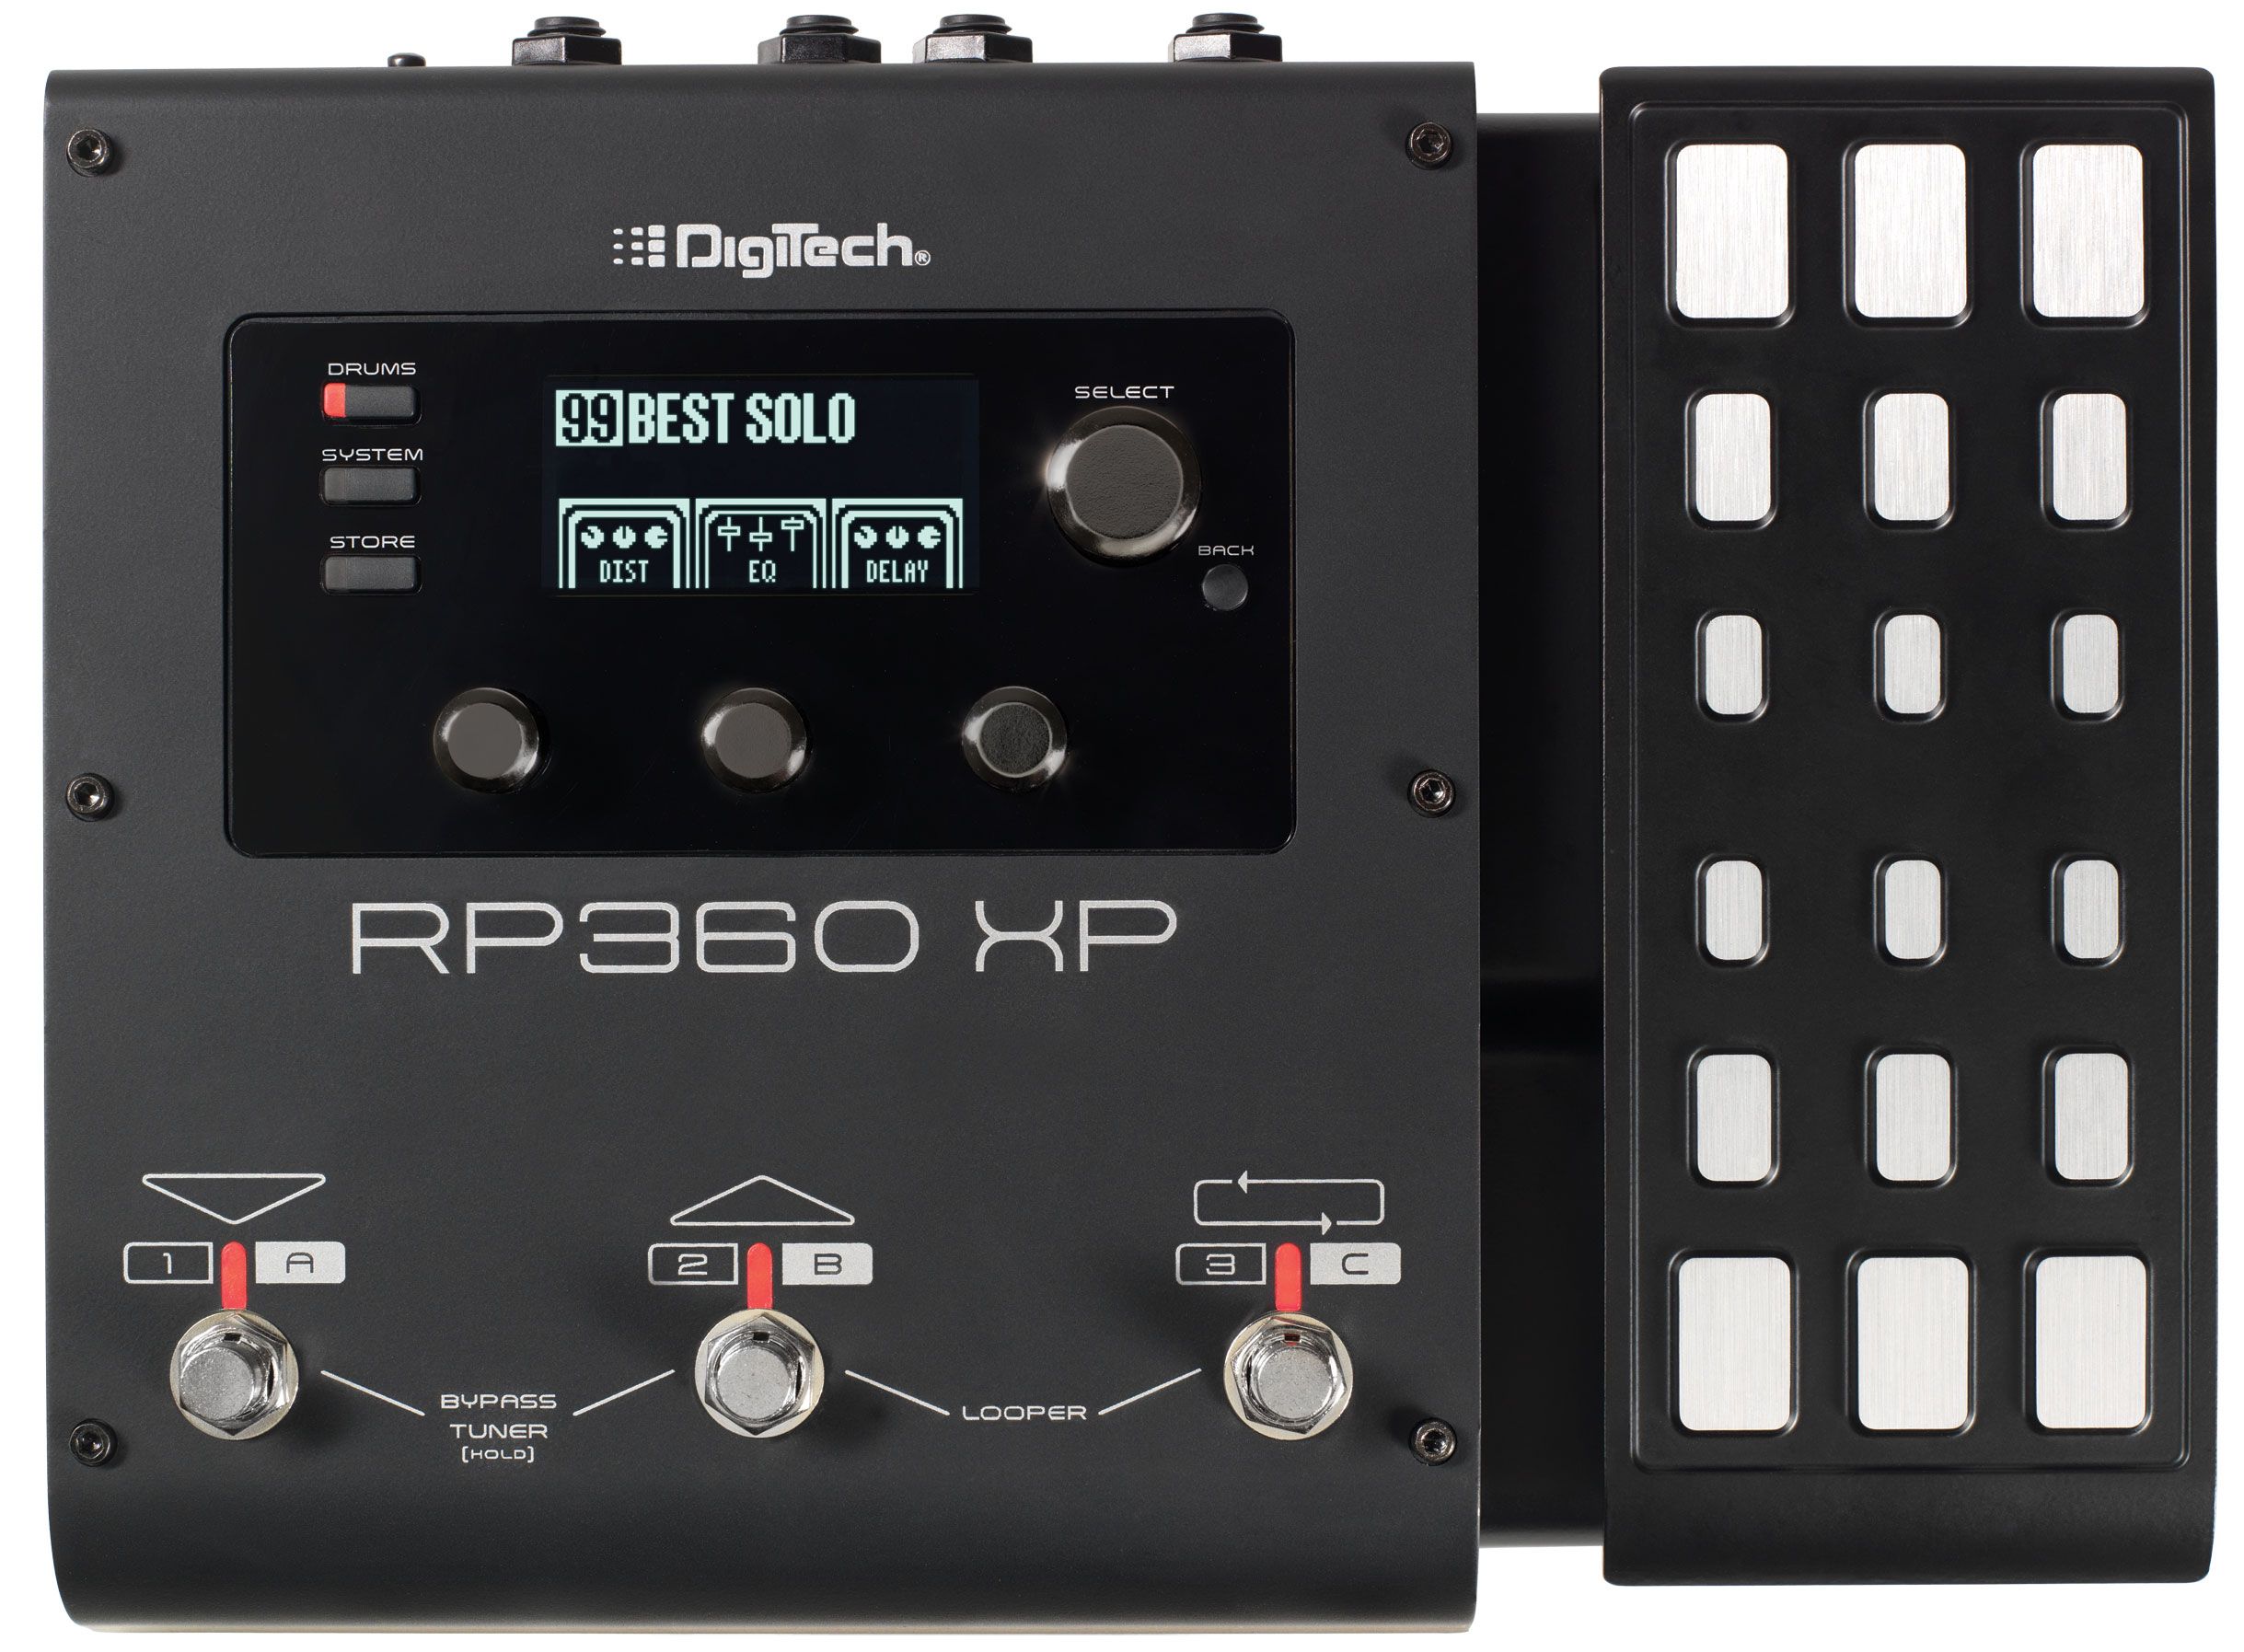
DigiTech RP360 XP
The pedal has so much going on, and it’s all implemented so perfectly, it could be difficult to figure out a place to start, so I’ll start with what it is: the pedal is what’s known as a multi-effects processor; it’s like having a bunch of effects pedals in one. There are 99 individual effects you can choose from, things like distortion and flange and delay and chorus and all the other types of effects you can have and buy individual pedals for, but these are all preset into the RP360 itself. Not only that, for the true tone savant, it comes with powerful software that lets you create your own effects via virtual pedals which I’ll talk about later on. One of it’s biggest advantages is that it plugs directly into your PC, bypassing the need for an amplifier. To say it’s convenient is the understatement of the century.
The pedal has many other functionalities which work beautifully as well. First off, there is a chromatic tuner (if you love going down rabbit holes, compare chromatic tuners to the superior, both in function and price, strobe tuners). There is also a drum machine that, surprisingly, works better than any other I have ever used, even those built into Digital Audio Workstations (DAWs), with the only handicap being they can’t fill out at the end of a song, meaning play a fill at the very end of the song rather than just cut off the beat, something DAW-based drum kits will do. The thing I have mostly appreciated about the built in drums is that they are very straight-forward beats, nothing fancy like jazz beats or break beats or that nonsense, just good, rockin’ beats. Of course, it also has a looper, which allows you to play a musical sequence then loop it back so you can play over it, making you a one man band; if you’ve ever seen those people who play at little fairs or sidewalks or cafes, and it’s just one person but they sound like a whole band, they’re using a type of looper – you can actually get pedals that just do that.
Then, there is the pedal within the pedal, as you can see on the right hand side of the device, and which is why this model has the ‘XP’ on the end. Digitech also makes a pedal-less version simply named the RP360, but it’s worth spending the extra $50 and getting the expression pedal (so called because it allows you to alter the impact of an effect in a continuous manner, such as volume or effect intensity). I love that expression pedal; just using it as a volume control is liberating. On the other hand, if you want to use it for wah or other tonal adjustments, you do you. It’s very versatile just in and of itself and really expands the range of what the whole thing can do. I can’t imagine having the RP360 without it; it’s definitely worth the slight overhead.
Something else to keep in mind about these pedals is that unlike plugging your axe into an amp, you plug your guitar into the pedal and the pedal into your PC. This can be more serpentine than it sounds. For example, in my setup, I plug my guitar into the pedal, then plug the pedal into a Focusrite Scarlett Solo seen below – that serves as the interface between the instrument / pedal and the PC.
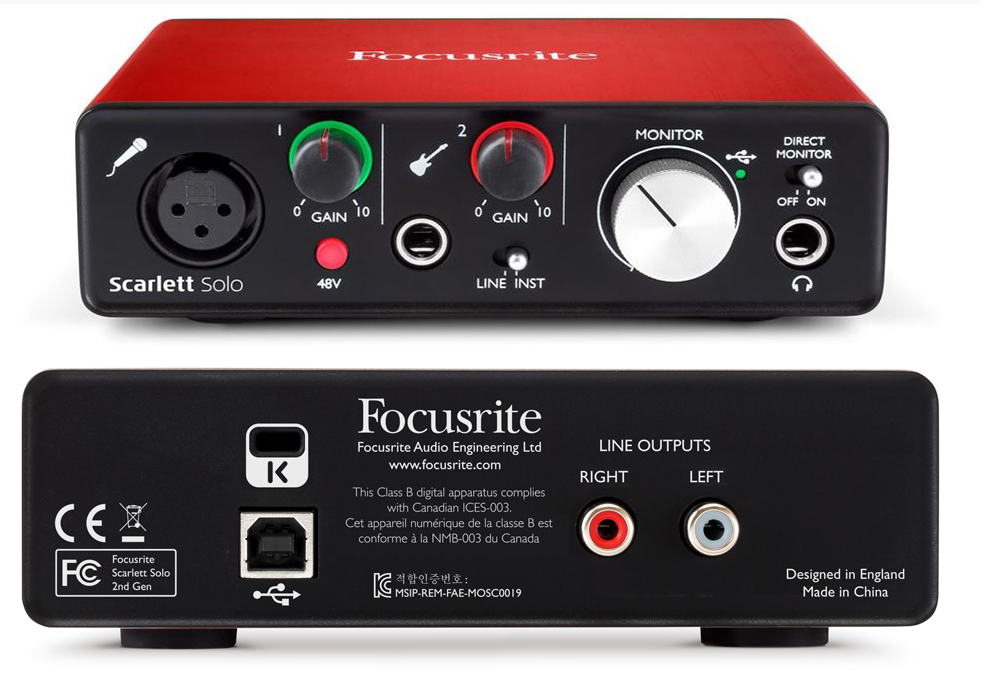
Focusrite Scarlett Solo
This isn’t a post about the Scarlett Solo, so I won’t go into too much detail other than to say you can see there isn’t a lot going on in back; I connected the right and left outputs to a set of Mackie studio monitors and plugged the USB into an open port on my PC – very easy. The front of the thing is where I plug in the pedal using the jack under the little guitar icon (and I only use custom Spectraflex cables – if you’re going to do it, do it right!). Curiously, I have to set the monitor switch to instrument, not line, in order to get proper output levels; I haven’t yet figured out why that is although I’ve been working on it. I also have a separate Blue Yeti microphone I use, so the XLR input there on the left goes unused, at least for now. Here’s the current setup I’m running at home, with an Oculus Rift thrown in for good measure – you can see the DigiTech on the floor, and the Scarlett Solo on the desk. The cable running fro the pedal and into nothing on the floor is what plugs into the guitar. All that’s left now is the cable management.

The setup
You don’t need to do it this way, you can simply run the pedal itself straight into your PC. That being said, the beauty of this whole setup is the amount of fine control it provides over all aspects of the sound. If I’m playing along to a track while recording, or a music file, or even to YouTube, I can set all the levels independently. I can adjust overall volume using the large dial on the right of the Scarlett while adjusting the levels of the instrument itself using the smaller gain knob, but you have to be careful with those: cranking up the gain can introduce distortion, and while gain is often purposefully used for that, unwanted distortion will destroy your carefully crafted tone. That’s why the light around the smaller dial will flash red if the gain is too high, and flash green if you’re within acceptable range. Of course, there are a myriad other ways to adjust sound through software specific methods such as Windows or app specific audio controls, like the volume within a YouTube video or audio application.
So back to the DigiTech. As mentioned earlier, it has 99 preset sounds built in, with flashy names such as White Limo, La Grange, and my personal favorite effect, DualPetaluma – it’s a nice, fuzzy yet subtle overdrive. Some of the names, such as DC/AC, SabbathVoid, Slayed and Gilmour, are obvious, blatant nods to the type of tone they provide. Here’s the list of all preset tones from the manual:

RP360 XP Tones
As also mentioned earlier, DigiTech has made available software called ‘Nexus’ that gives you the ability to set your own sounds effects and tweak them to your heart’s content by using virtual pedal boards. This brings up two very important points that need to be made: First, if you ever watch a professional guitar player, they will have a pedalboard on stage that they use to change the sound of their guitar depending on which pedals are active and which aren’t, and how those pedals are configured. I have a few pedals in my office, if you can believe it, although there is a vast variety of pedals, effects, and manufacturers who supply them. I’ve included a couple of pictures below; the first is one I just found on the web somewhere, and it shows a tiny sample of the variety available, although those are mainly footswitches, meaning you step on a switch to activate them, whereas footpedals seen in the second picture from my office are more traditional (and colloquially known as) stompboxes, where you step on a pedal to activate the effect. Of course, stepping on the pedal just activates a switch anyway – see how it all comes together?

So many footswitches
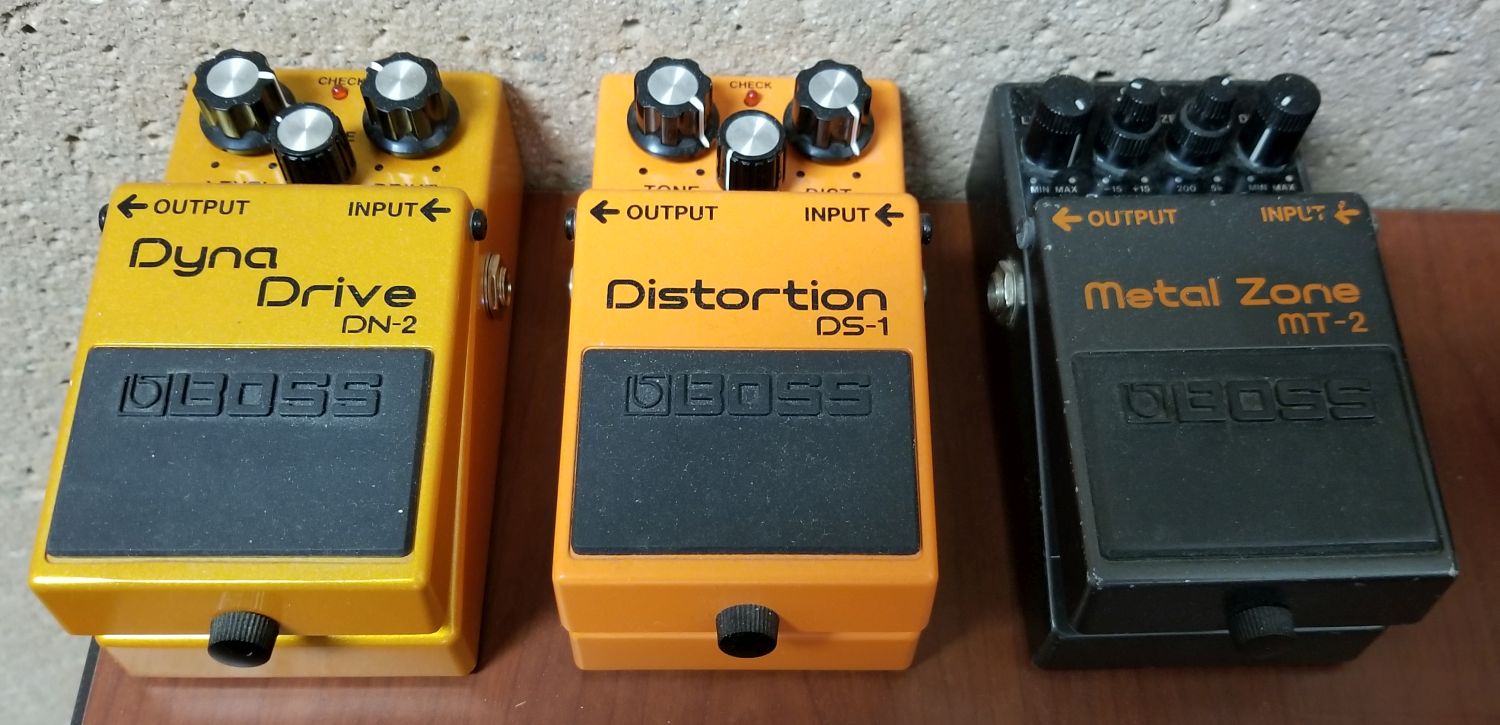
You weren’t an 80s metalhead if you didn’t have a few BOSS pedals
It’s important to mention footswitches and footpedals because the RP360 replaces all of them with a single unit, but it also includes a bunch of individual, virtual pedals that you can tweak to your heart’s content using the aforementioned Nexus software. The other thing to know about guitar players specifically is that we chase tone eternally, always searching for the perfect sound. It’s like the Holy grail; it’s never meant to be found, the truth is in the chase itself, and good thing, too, because perfect tone has never been achieved by anyone that I’m aware of, and we are all still chasing it.
That’s important because Nexus feeds that addiction. You can string all sorts of virtual pedals together, tweak the settings of each one, and play with tone until the end of time. There are many open slots in which you can store your own creations and make them available from the pedal itself, calling forth the glory of your tonal creations with a simple step on the switch.

Nexus software
As you can see, you can set up a virtual pedal board with an infinite number of pedal combinations and setting for each. Again, when performing live, even for big shows in stadiums or arenas, guitarists will have actual pedal boards that don’t look too different from what you see here, and even the order of how the pedals are daisy-chained can have a big impact on sound with later pedals processing earlier pedals’ sound. But the DigiTech comes to the rescue and puts them all in one, although order still matters. I’d also like to give them credit for so carefully avoiding a copyright issue – these are all modeled after real pedals, and some are pretty close. For example, if you look at the far left, you’l see what they call the ‘Cry Wah,’ when there is an actual line of pedals called the Cry Baby wah, so they’re threading the needle here in some cases.
You can also choose the type of amp the thing models, as different amps often have different sounds (Marshall or Fender for straight up rock walls, Vox, known for the British sound of the 60s, similar to Orange, a versatile amp used for decades which also happens to be my personal favorite brand, and many others). All amps have unique, identifying visual designs and you can see that in the head / cabinet setup at the top of the Nexus window they mimic the visual design of actual amps but not the name, just as they did with the pedals. Very nicely done.
Anyway, you can see how someone could just endlessly tweak from now until the end of time, making slight adjustments in their endless pursuit of the perfect tone. This is also where the user would set the impact of the expression pedal; here it’s set to adjust the volume, which is also my main use for it, although it can additionally be used to set the wah effect and impact. LFO is Low Frequency Oscillator which lets you have an effect, well, oscillate in and out, or ‘breathe,’ as musicians say. I’ve never had the need to use that, so I can’t speak to it here.
The last thing I want to mention about the software is that because the pedal, at least in my case, is not connected directly to the PC, the software doesn’t have any effect. I could run a direct USB connection from the pedal directly to the PC to load the sounds and get firmware updates, but the way my own personal set up is being run, I would have to run an additional USB from the pedal to the PC. Just something to keep in mind.
Finally, I use a free software DAW, or Digital Audio Workstation, called CakeWalk for recording, which is a separate post to itself. I’m currently recording a song called ‘Howl,’ and here’s a screenshot of the DAW in the middle of that process. You can see I’ve already laid down rhythm guitar, lead guitar, drums straight from the pedal, and am getting ready to add vocals, which usually come last. The ‘wolf’ tracks are sound effects which I’ll merge into a single track later.
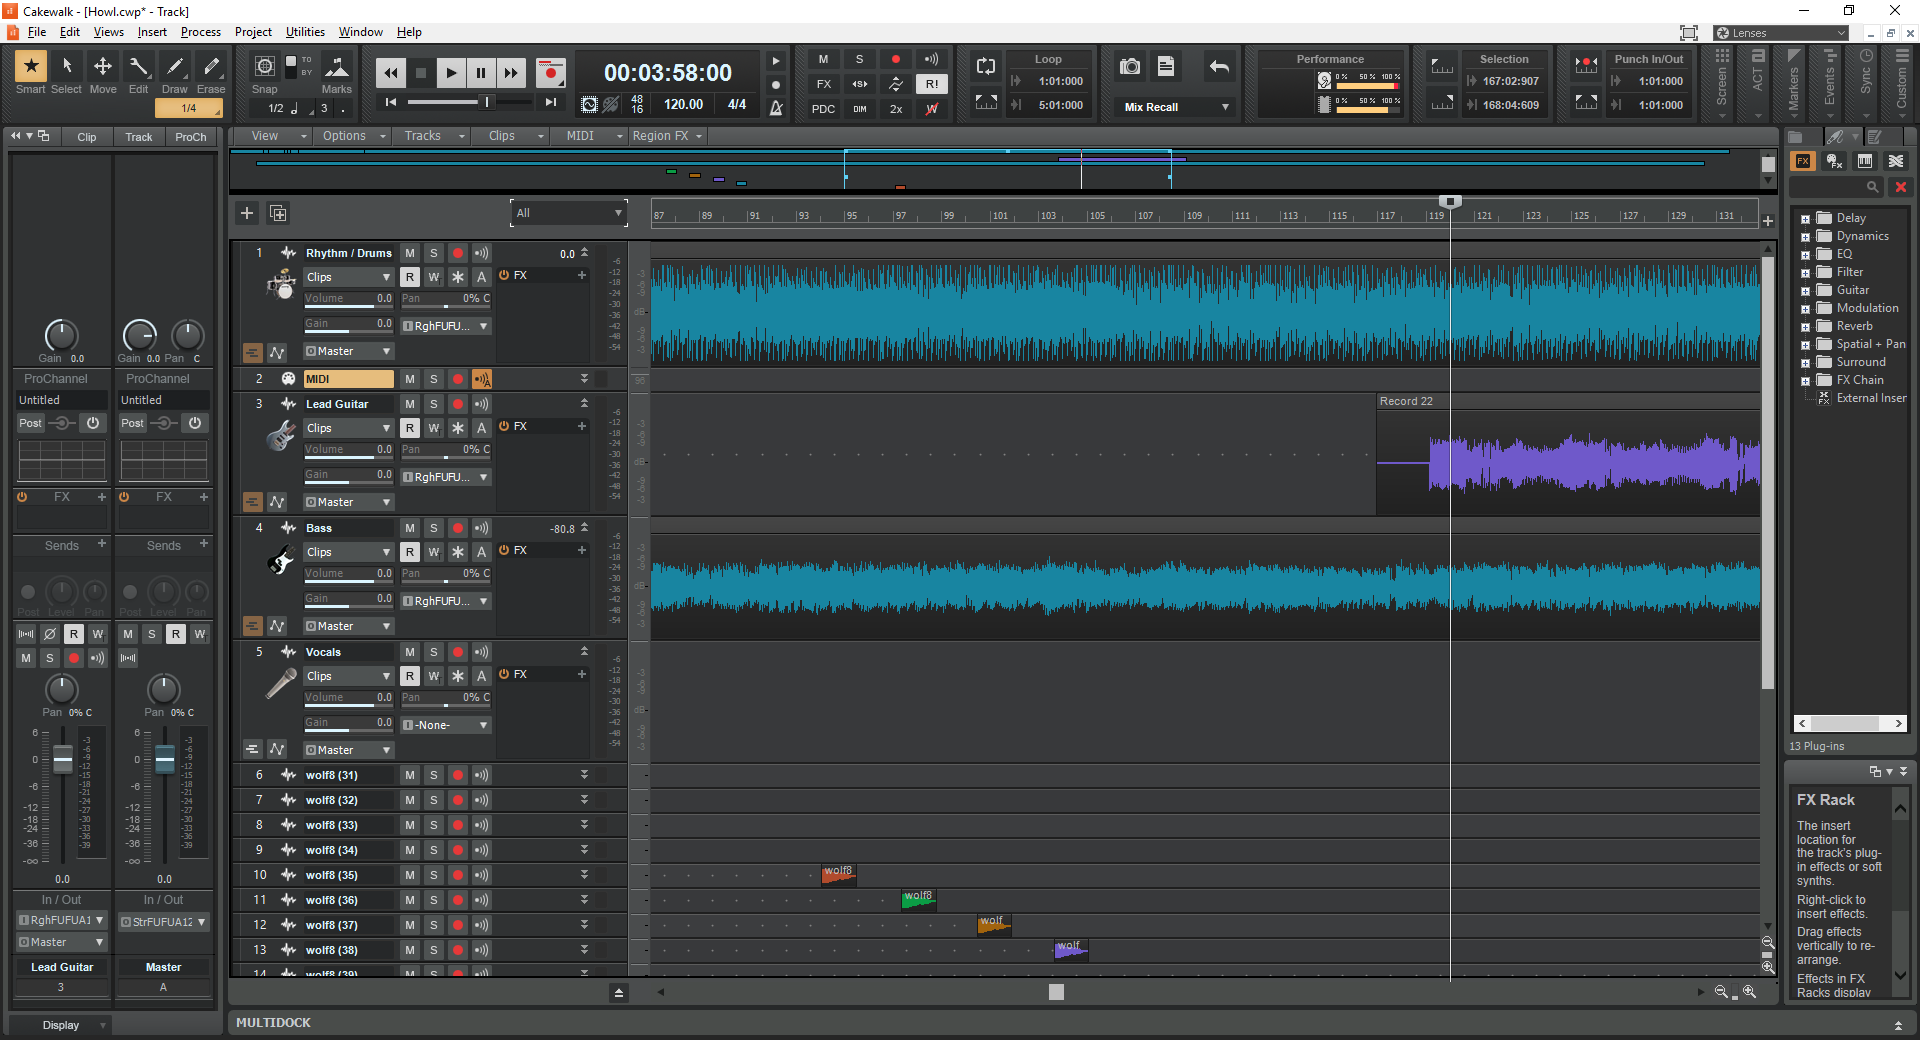
Cakewalk
Using the pedal, whatever I play gets recorded straight in, and since I use a separate mic, and the pedal has built-in drums (whose tracks can be a nightmare to separate from any pedal-routed guitar tracks), and it can be used with bass or anything else, I can record whole songs on my own, without having to go into a studio. While I have lots – LOTS – of studio experience, being able to record at home is so nice. I can send tracks I’ve recorded around to others, or they can be sent to me, and so when the principal songwriter of the band I play with writes a new song, we can each record our own parts then mix the whole thing down, or one person can record his part, then send the track to the next person who adds his track, and so on until the song is complete. Really easy and doesn’t require everyone in the same place at the same time for the ever-increasing expense of studio time. On a side note, if you’re interested, you can hear a sample of our stuff, with me on bass, here (pop), here (surf), and here (hard rock).
So let’s give it a listen, see how it sounds, see how it works, and if you’re looking to expand your sound, consolidate your pedals, do some recording, I can’t recommended this pedal enough. It’s not just the best pedal I’ve ever used, it’s one of the best anything I’ve ever used.
The GDPR finally hits IS301.com

Let me be upfront: I’m making a lot of assumptions with that title. Still, you’ve probably noticed that many, if not all, of the online services you use have sent a flurry of emails indicating in one way or another that they are updating their privacy and security policies, and some just come right and state that it’s because of Europe’s new GDPR, or General Data Protection Regulation which goes into effect in just three days. It’s impossible to sum up such a sweeping set of rules in anything close to a brief post, but essentially what they are trying to do is ensure that any company who does business in the European Union protects the data it collects from customers and others, and more importantly give people control over their own data.
This manifests in several ways I’ll touch on here: One is that the vagueness that often accompanies privacy / security policies must be abolished. I’d honestly never thought of it in these terms until the GDPR came around, but some policies sneakily combine disparate policy acceptance into a single action. That’s a complicated way of saying that when you agree to a privacy or security policy, you’re actually agreeing to many things that cover many aspects of data storage and handling. So instead of signing off on each line-item bit of the policy on its own, you’re agreeing to everything in one fell swoop; you can’t tease apart the various components of the agreement based on aspects you agree with and aspects you don’t. So that’s one thing the GDPR aims to fix.
Seriously – have you ever read some of these privacy policies? (Norway has).
It also wants to give users complete control over the data that is gathered and stored about them, and I do mean all aspects. They can give consent for data to be collected and stored, and they can revoke that consent at any time. They can request readable by both man and machine (that’s an important point) reports about what data is being kept about them and have them transmitted to another provider or service. If there is data that is incorrect users can request it be corrected and they can request their data be expunged completely, both of which are required to be done without undue delay.
Finally, at least for this summary, it requires complete transparency when a breach happens, with companies immediately alerting those affected and informing them what can be done to help address the problem. It also attempts to hold companies and services accountable for data breaches, to the tune of immense fines if they happen. According to the section of the GDPR official site that addresses financial penalties:
Amount
If a firm infringes on multiple provisions of the GDPR, it shall be fined according to the gravest infringement, as opposed to being separately penalized for each provision. (83.3)
However, the above may not offer much relief considering the amount of fines possible:
Lower level
Up to €10 million, or 2% of the worldwide annual revenue of the prior financial year, whichever is higher, shall be issued for infringements of:
- Controllers and processors under Articles 8, 11, 25-39, 42, 43
- Certification body under Articles 42, 43
- Monitoring body under Article 41(4)
Upper level
Up to €20 million, or 4% of the worldwide annual revenue of the prior financial year, whichever is higher, shall be issued for infringements of:
- The basic principles for processing, including conditions for consent, under Articles 5, 6, 7, and 9
- The data subjects’ rights under Articles 12-22
- The transfer of personal data to a recipient in a third country or an international organisation under Articles 44-49
- Any obligations pursuant to Member State law adopted under Chapter IX
- Any non-compliance with an order by a supervisory authority (83.6)
As you can see, they are not screwing around, however this is also the part I take issue with. I don’t have a problem with the transparency issues, however as any of my students knows, it is impossible to have one hundred percent security. That would mean no one can get in to utilize or benefit from whatever is being protected. And the split-second one person has access, the door is open to all sorts of potential problems. The vectors for attack and infiltration are so great, it’s a nonstop, every second of every day war to protect data, and if it happens it can’t always be laid on the shoulders of the company; they could be working feverishly to squelch millions of little fires yet someone could still be burned. This is something I feel could really use a revisit, and likely will in the future. There is no way this doesn’t undergo revision and fine-tuning as the years go on.
So how does all of this relate to this website? Only in some very small ways as I don’t actually do business – as it were – over there, over even over here, for that matter, but the website has a potential global reach, so why not jump in on the ground floor?
I was first notified that I had a new ‘Privacy’ entry in settings. Clicking on that showed me the following page:
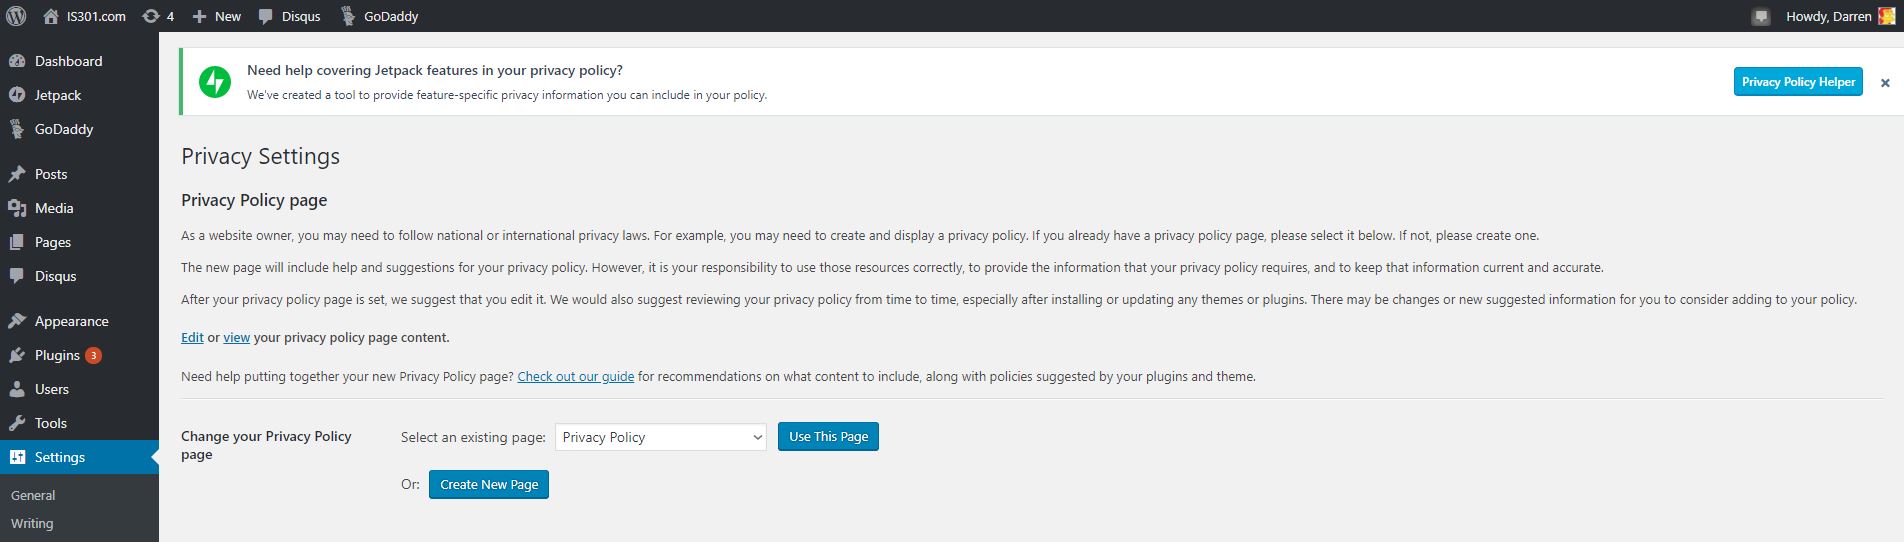
Privacy settings page
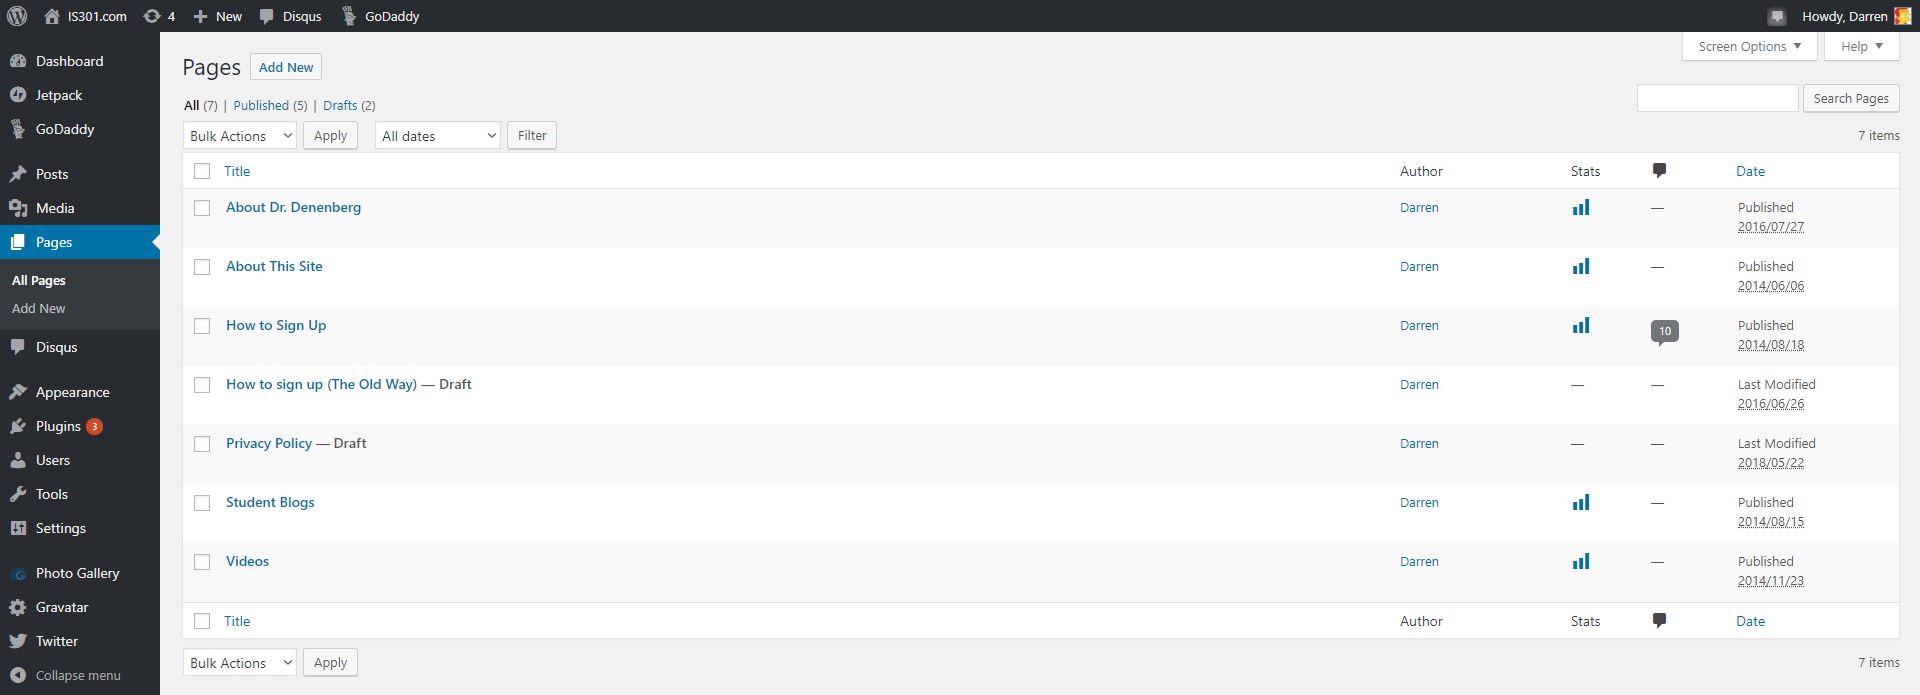
You can see in the left sidebar there is an entry called pages, and that’s where separate, standalone pages are developed and managed. Pages such as the ones you see linked across the top of IS301 like ‘About This Site‘ and ‘About Dr. Denenberg.’ It took me a minute to realize this new settings page was telling me I now had an additional page titled ‘Privacy Policy.’ Just to be sure, I went over to the ‘Pages’ section to see, and sure enough, among all the others, there it was.
I see you, new security page!
And here’s what it said.
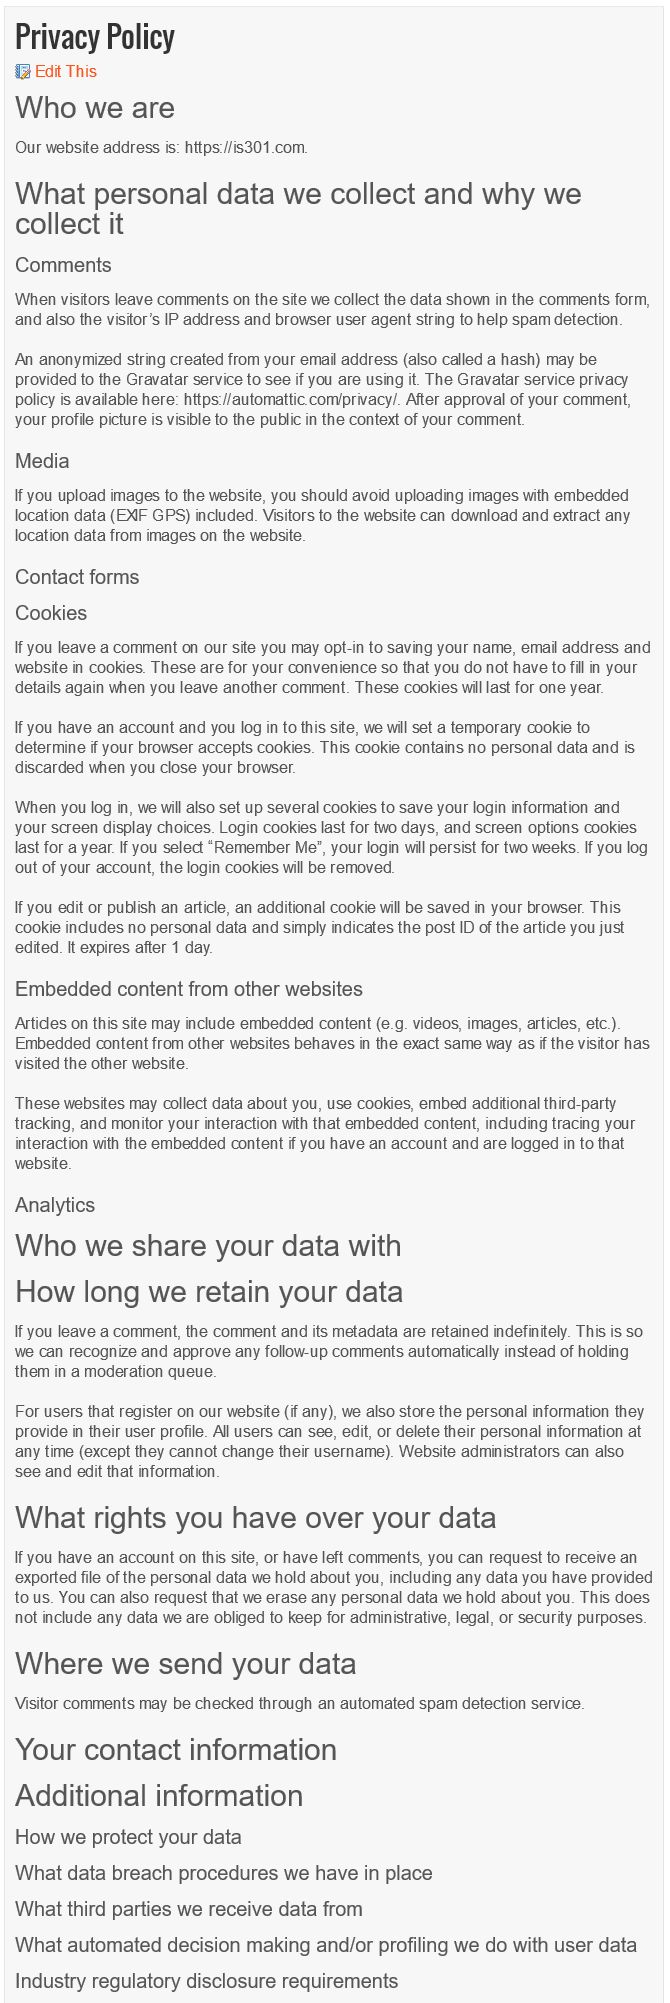
Privacy Page
Very, very generic. Many words, yet says very little. I prefer it has fewer words yet says a lot, so I made some…minor changes.
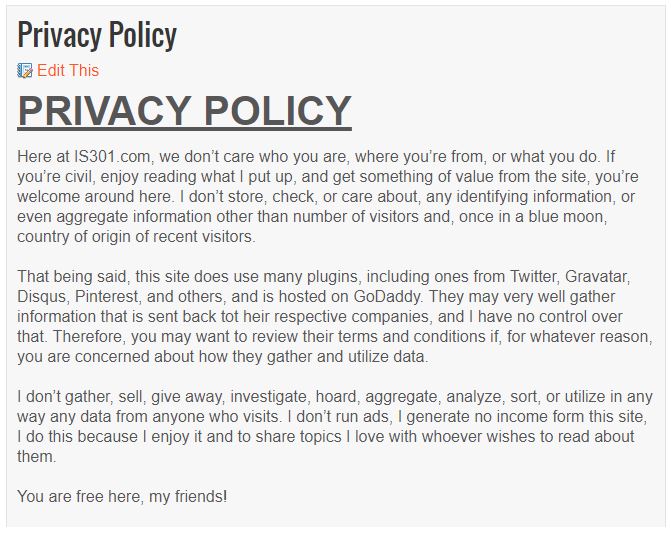
New Privacy Page
Much better. As I said, I don’t do business in the EU, or the US or anywhere else for that matter. Even so, everyone else is preparing, so I may as well. It wasn’t a big deal, but it shows that impact this new legislation is having, from the biggest sites and services on the Internet down to tiny IS301.com.
UCI team wins the 2018 IEEE GameSig competition!

Once again, a student-based game development team from UCI has been declared the winner of the annual IEEE GameSIG game development competition; that’s them in the main image. The competition, held every year and featuring games developed by student teams from multiple regional colleges and universities including UCI, Fullerton, Chapman, Cal State Long Beach, USC, and others, brings a narrowed-down field of ten finalists from this year’s original field of twenty; these ten games were the ones the review and selection committee, of which yours truly, meaning me, is a member, felt were the cream of a very rich crop. Yet even with all that fierce competition, UCI won, and in fact has won for the last seven years straight. It’s held at a different campus every year, each hosting the competition on a rotating schedule, but no matter where it’s held, UCI always brings home the trophy. I’m co-Chair of the reviewer committee along with professor Dan Frost who has been doing it since the beginning but recently retired, and one of the organizers, so I’ll have my work cut out for me next year as the 2019 competition will be held at UCI.

Setting up for the competition
The final award winners, their respective institutions, and the awards they won for this year were:

Sky Farm – UCI
Reinvent the Wheel – Chapman
360 images with the Gear 360
That title makes roundabout sense. I’m witty today!
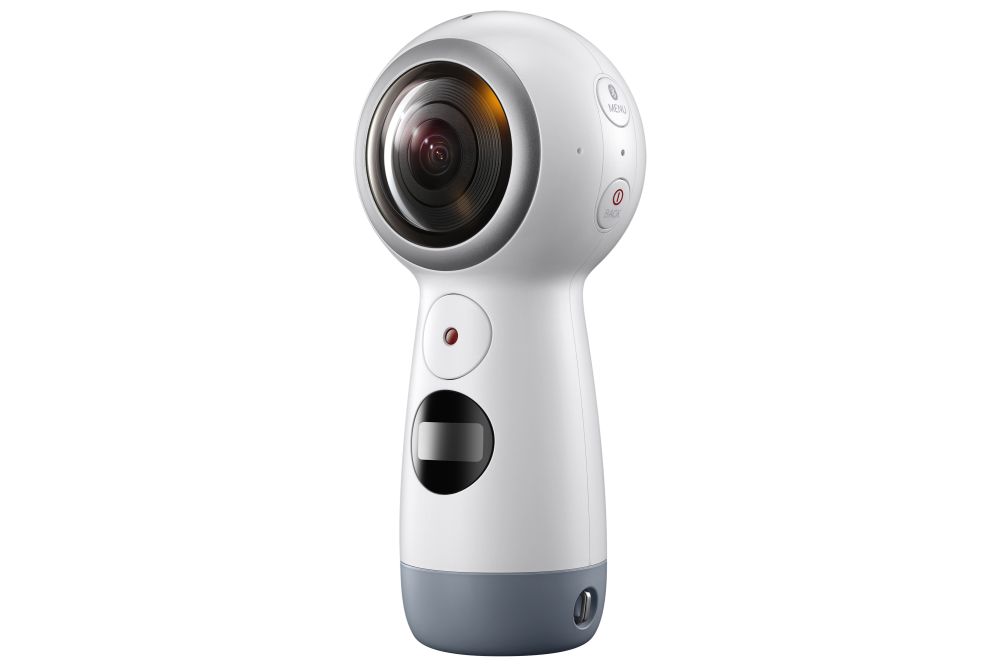
I’ve always wanted to try out the Gear 360, a camera that can take 360-degree images and movies that can not only be viewed on your phone, but – for lack of a better and more grammatically-correct phrase – ‘spun around in.’ I recently had a credit applied to my Samsung account that made the normally $200ish camera $99, and I couldn’t pass it up. Just to be clear, we are talking about the newer version, which looks like a ball on top of a little post, not the first version which looks like a golf ball on a tripod.
After returning the first one because it was clearly a used item, the new one finally arrived. I was eager to try it out but had to charge it first, which took some time. The camera itself has a rounded top with cameras on both sides of the golf-ball shaped and sized head. There is a small screen on the camera that provides various bits of information, such as battery level, resolution setting, and so on. There is a power button on the side and record button on the front (The camera is symmetrical, so I’m calling the side with the screen the front, and the side with the power button the back; completely arbitrary). A second button on the side will pair it with your phone, and the Bluetooth pairing needs to happen before it will send images to your phone, obviously. You can also store images on an SD card for download later. As for compatible phones, either Samsung or iPhone; I have a Galaxy, and I have heard it doesn’t work so well with others but I can’t confirm that.
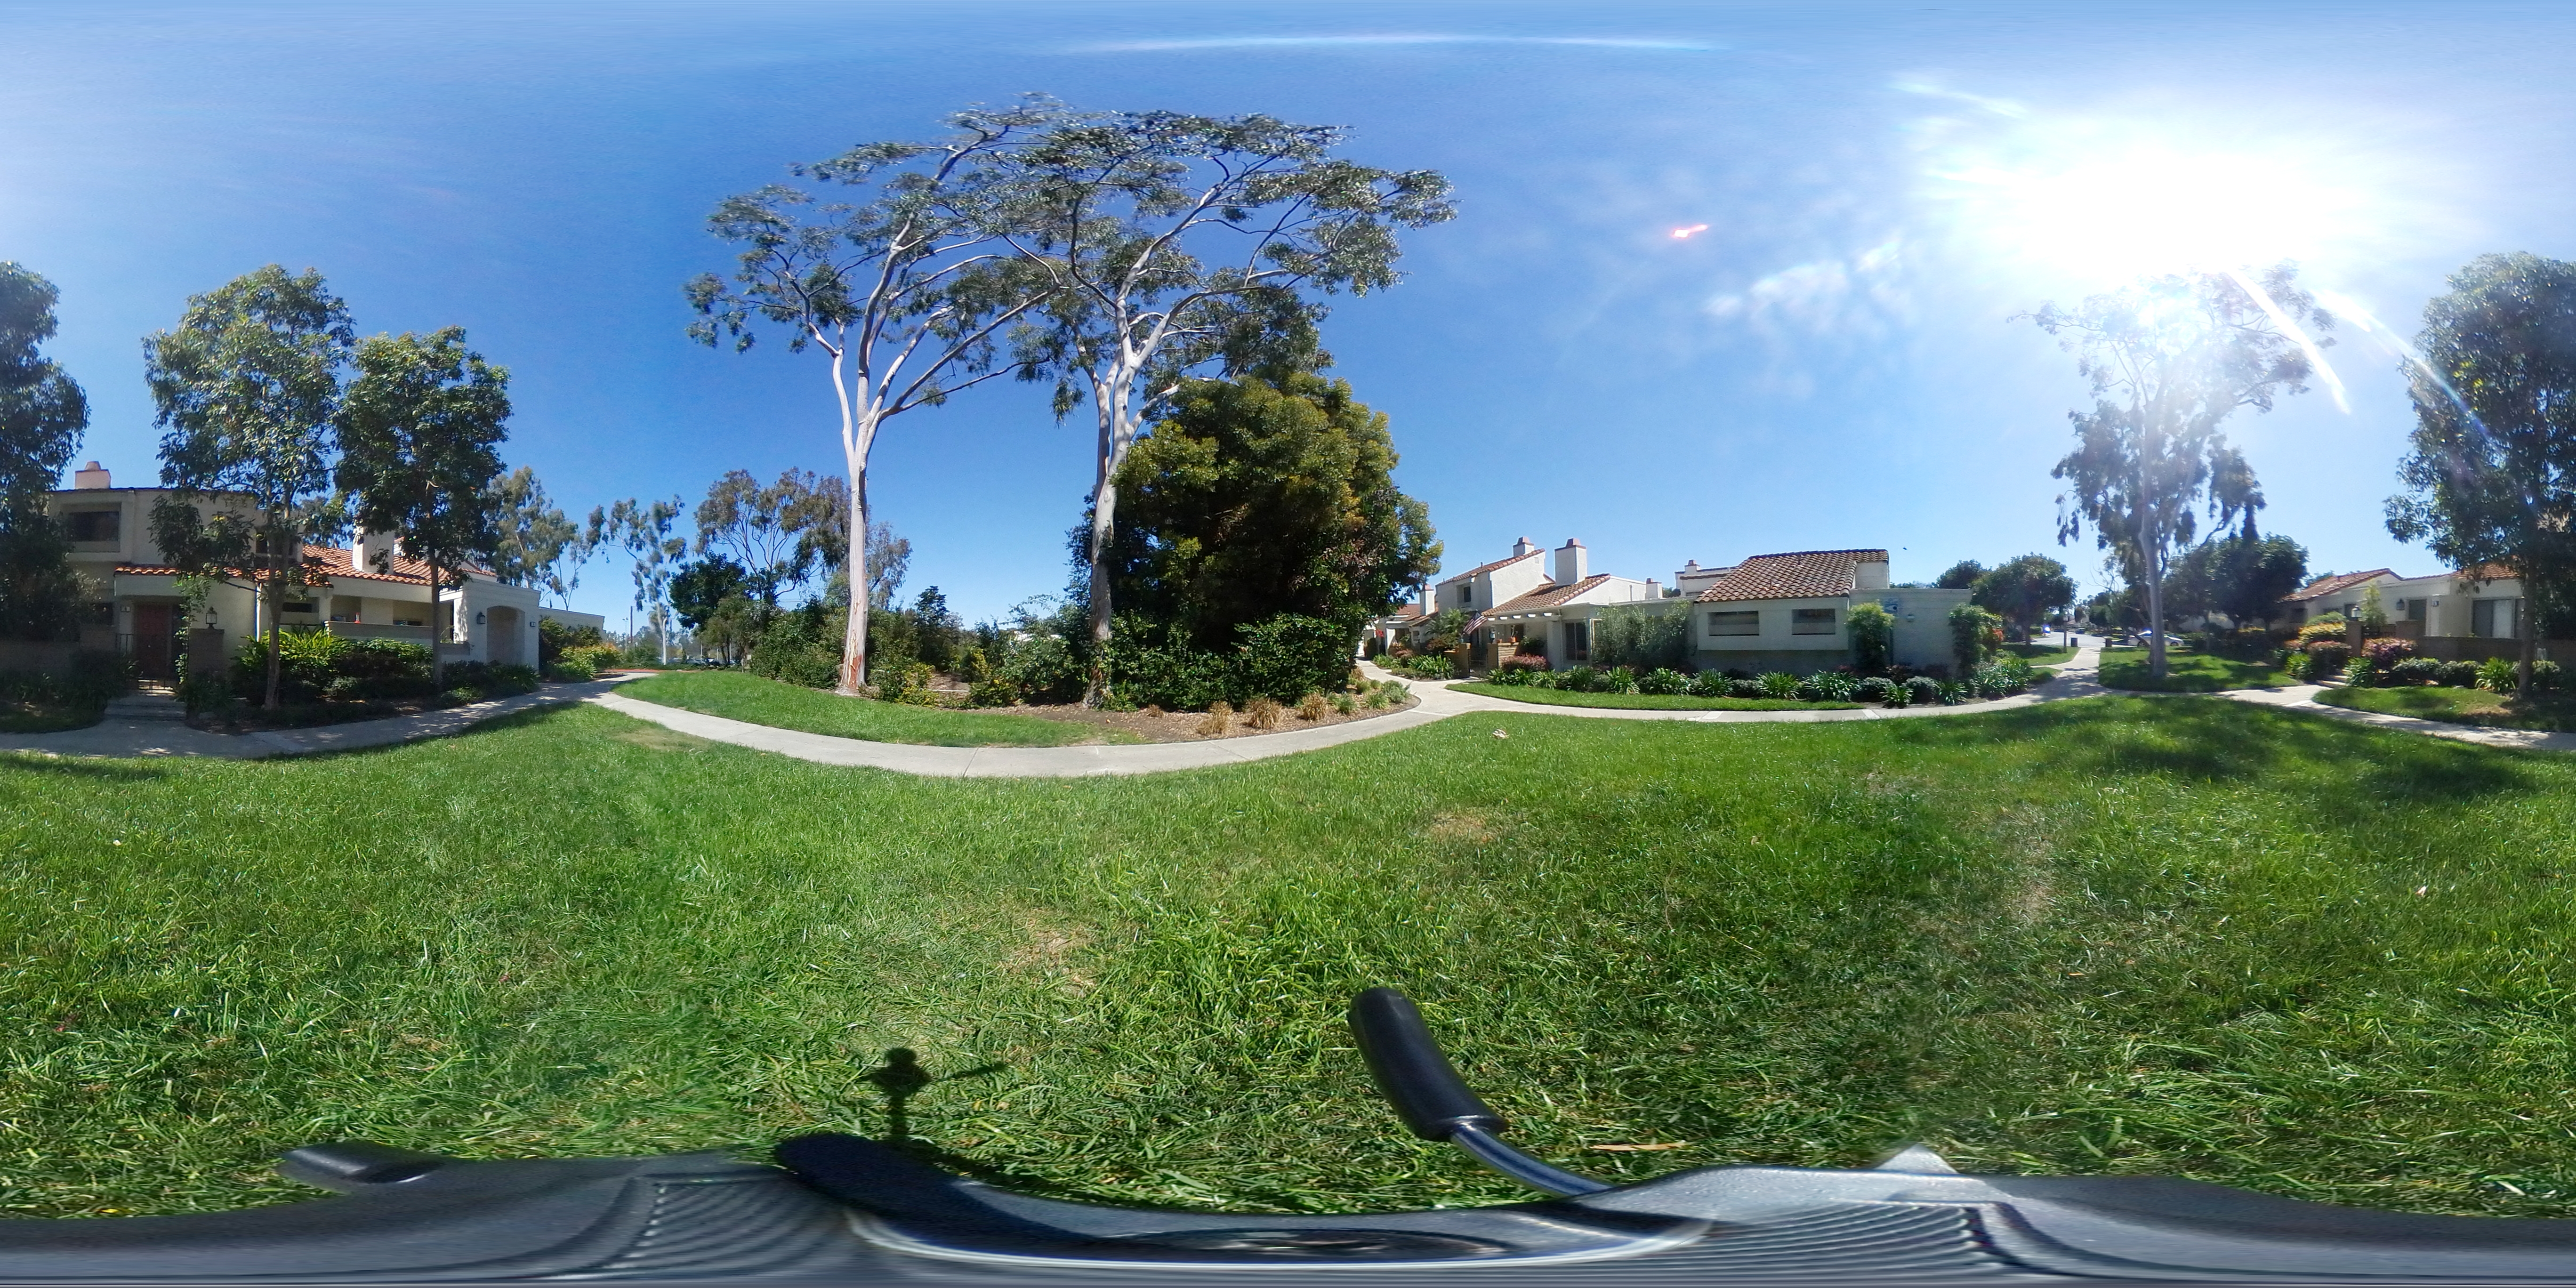
I started with a shot of my office, hoping to see great things, however even though the 360 touts itself as a 4K-capable camera, the results were anything but that, and moving on to some shots of the campus didn’t change anything. Before I show some examples, I should also mention that there is really no way to view them other than on your phone, or by using very specific websites. I can’t just upload them here and expect them to work, I have to have a dedicated WordPress plugin to get them to show properly. In Microsoft’s OneDrive, the picture shows as a flat image that appears clearly warped, while in Google Photos it’s recognized as a 360 image and displayed as such (Direct link to Google photo sample here, you’ll have to click on the little circular arrow in the upper right-hand corner to switch to 360-degree view). OneDrive version is below.

OneDrive representation of a 360-degree photo
The pictures are easy to take, and you can do so remotely via the app or from the camera itself. In fact, in the Google version of the above image, if you look closely down the line of the brown trashcan the camera is sitting on, you can see me behind the lattice taking the picture. There are other settings you can adjust as well, and although the pixel count of the images is huge, 5742 x 2736, the quality just isn’t there.
From a distance images look good, and when viewing on a phone they’re definitely passable, but upon closer inspection details are washed out and fuzzy, with lack of detail prevalent throughout. Contrast is poor and edges lose focus. Colors can be good, but are often faded or diluted. Note, for example, the purple trees in front of the building: The color is washed out, as is most of the image, and the detail is terrible.
Overall the image conveys what it represents, but it could be so much better. I adjusted many of the settings but was unable to increase the quality of the settings in any meaningful way. Strangely, the newer version of the Gear 360 actually has a lower resolution camera than the original model, and significantly so: the original had 15 megapixel cameras while the newer model, the one I’m testing, has 8.5 megapixel cameras. That’s a reduction of almost half.
I also haven’t yet had the opportunity to test the video, and I will post updates when I do. Speaking of the significantly lowered resolution in the cameras, it takes proper 4K videos (4096 x 2140 at 24fps, which is the theater standard for 4K), while its predecessor took what is known as UHD video (3840 x 1920 at 30fps, which is the broadcast standard for ‘4K,’ but is not true 4K).
It also has a lower capacity battery as opposed to the first generation Gear 360, 1160mAh v. 1350mAh (milliamp hours), however without knowing the specific power draw of the device I can’t calculate how many hours that translates into. The standard is mAh / draw = total hours of power. I’d guess around an hour, although in my tests on campus and around the house I had plenty of battery life left even after shooting a bunch of pictures, transferring them, and so on.
So, it’s good but definitely not great. I don’t like the downgrade in so many of the specs from the first generation of the device; it’s like when the clock would tick backwards in school before the bell finally rang for recess. I know something good is coming, but the Gear 360 is at once a step forward and a step back. If they can improve the quality of the images for viewing at a larger scale, then they could really have something here. And it’s not like there isn’t competition: The next most popular would likely be the Ricoh Theta, which, from what I’ve read, bests the Gear 360 in almost all aspects, but I have no hands-on experience with it.
I’m also using this post to test the plugin for 360 images, and I’m putting all the ones I took below (you’ll have to click to open them up) – let’s see how it does!
Update: How strange. In order to embed the 360-degree images, I installed a plug-in called WP Photo Sphere that works by inserting a shortcode of the form “sphere 1234” in square brackets. In a test post that has nothing but that shortcodes, it worked perfectly. In this post, they don’t work at all, at least on my machine. I have no idea why, I’ve been investigating for almost a week but I will keep looking into it. It’s a nifty feature when it works.
Update 2: Apparently all I had to do was make the page live. When published, everything worked fine. I did nothing, but I will take all the credit for it. Sweet, sweet credit.
A new exploit for Intel processors?
Whether or not this turns out to be a big deal is yet to be seen, but research from collaborators at UC Riverside, Binghampton University, Carnegie-Mellon Qatar, and the College of William and Mary, have discovered a new possible exploit in certain Intel processors that they have dubbed BranchScope – that link will take you straight to the research paper itself. The research is published in the Proceedings of the Twenty-Third International Conference on Architectural Support for Programming Languages and Operating Systems (ASPLOS).
This is a new form of predictive execution exploit, in which the CPU attempts to predict what will happen as the result of a particular instruction, then branch based off of that guess, then guess what will happen as a result of that particular instruction, and so on. It’s the same kind of manner in which a computerized chess game plays chess: Every time you make a move, the game will play out thousands of games as a result of that, trying to guess the moves you will make and the moves it can make in response, and decide on an appropriate next move as a result. It doesn’t make this guess blind, either: In the processor is a component of the Branch Prediction Unit, or BPU, known as a Pattern History Table (PHT) that stores the results of previous operations, and each time a particular branch is taken, the ‘value,’ for lack of a better term, of that branch is increased or decreased. That allows the BPU to be more accurate in its future predictions (Spectre attacked the other part of the BPU, the Branch Target Buffer, which focuses on the result of a branch as opposed to the choice it made).
The exploit, therefore, is to set up selected branches that will modify the PHT and run them so that the PHT will always select one branch over another in a given situation, as well as monitor that the changes to the PHT have actually taken place. These attacks can be used to ensure a particular path is taken when predictive execution happens, and that can be used to divulge information that is otherwise unaccessible, even to the OS, such as key segments, or even provide access to the Software Guard Extensions (SGX), an Intel feature that allows deft software developers to place sensitive or critical data off in protected areas of the CPU cache that should, ideally, be available to none besides the program itself. The whole purpose of the SGX is to prevent bad actors from accessing the data.
Both the Specter vulnerability and BranchScope as well remind me of the more widely-known and difficult to pull off NOP, or No-Operation, Slide (sometimes Sled or Ramp) type of attack, in which an attacker attempts to bypass a series of CPU instructions such that when an operation does happen, it ends up in a specific portion of memory where malicious code has already been installed and will then be run. These often fail, by the way, and in fact the section of memory that holds the malware will often be padded in front and behind so that the target memory location is bigger and the slide hits by luck; it’s a big shot in the dark. The hex value of the NOP is x90, and if you look at the image below which is tracing CPU instruction executions, you can actually see the slide happening as the series of ’90s’ at the top of the lower left and lower right window (source: samsclass).
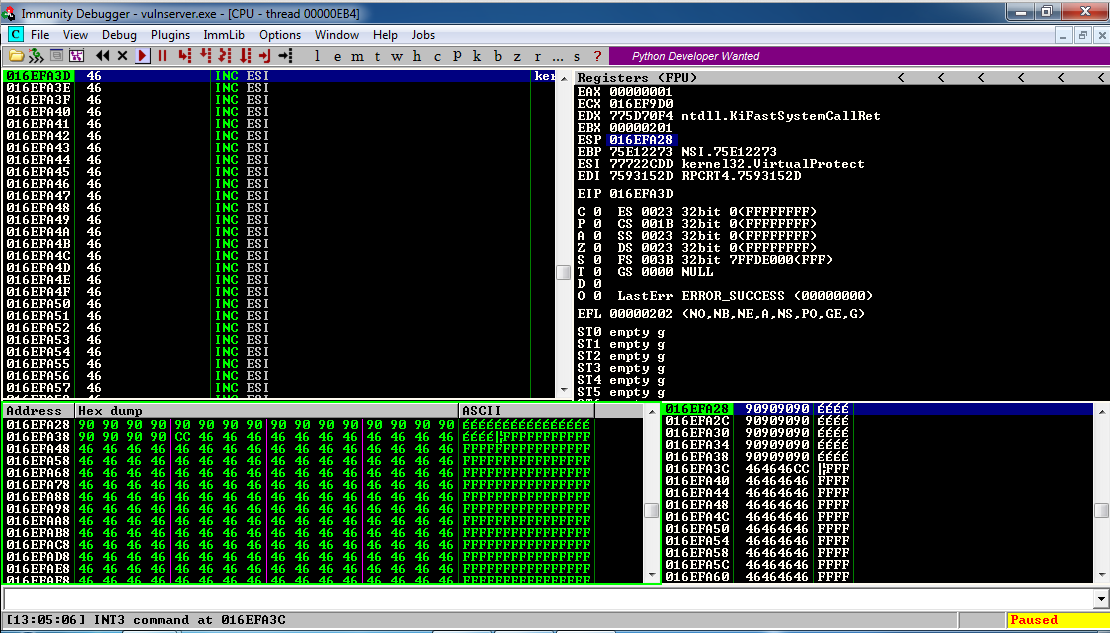
NOP Slide (Lower left). Source: samsclass
This is called a side-channel attack because something is running that shouldn’t be, similar to how loading non-approved, outdated, or unkown-source OSs or apps on a smart phone is considered side-loading.
Predictive execution is complex, the exploits are complex, and as stated earlier, whether or not we see them in the wild is a completely separate issue; the payoff would really have to be worth the effort and I don’t see that being the case unless the exploit was adapted to pair with, say, a trojan horse-style attack, but even then the nature of the returned data would be useless without significant analysis. Knock on wood, but I don’t see this as a common attack vector in the near future.
Thought I’d finally give Assassin’s Creed: Black Flag a try. Here’s the EULA I had to accept.
This isn’t a formal post, it doesn’t even get a header image – it’s just a note about what EULA’s can be. I’ve highlighted the important parts in bold, and there is more here regarding Microsoft than Ubisoft, and when pasted into Word, it comes out to almost (but not quite) seventeen pages.
Also, you may notice the word ‘Licence’ right there at the top of the thing. In Europe that’s a noun, but that form isn’t used in America at all; instead, ‘license’ is the noun and the verb.
With that out of the way, read the whole thing! Or have we not learned our lesson from Facebook?
END USER LICENCE AGREEMENT
PLEASE READ THIS END USER LICENCE AGREEMENT CAREFULLY. This End User License Agreement (“EULA”) governs your use of the videogame, application, software, their associated upgrades, patches, and updates and related services (the “Product”) currently provided or which will be provided by UBISOFT ENTERTAINMENT S.A., or any one of its subsidiaries or affiliated companies, including without limitation UBISOFT EMEA SAS, UBISOFT INC. or UBISOFT MOBILE GAMES SARL (collectively referred to as “UBISOFT”).
This EULA sets out the basis on which UBISOFT makes the Products available to you (“User” or ”You”) and on which You may use them. UBISOFT’s Privacy Policy (« Privacy Policy ») which can be found on http://www.ubi.com, forms an integral part of this EULA. By installing or using the Product, You agree to accept and to be bound by (1) this EULA and (2) the Privacy Policy at all time. If You do not agree with one of these, please do not install or use the Product.
If You have a UBISOFT Account which can be found on http://www.ubi.com (“Account”), this EULA shall coexist with, and shall not supersede, the Terms of Use. To the extent that the provisions of this Agreement conflict with the provisions of the Terms of Use, the conflicting provisions in the Terms of Use shall govern.
UBISOFT reserves the right to change, modify, add or delete articles in this EULA at any time, in accordance with the procedures described below in Section 9.
Capitalized terms used in this EULA without definition shall have the meanings specified in the Terms of Use.
1. GRANT OF LICENSE.
1.1 UBISOFT (or its licensors) grants You a non-exclusive, non-transferable, non-sublicensed, non-commercial and personal license to install and/or use the Product (in whole or in part) and any Product (the “License”), for such time until either You or UBISOFT terminates this EULA. You must in no event use, nor allow others to use,the Product or this License for commercial purposes without obtaining a licence to do so from UBISOFT. Updates, upgrades, patches and modifications may be necessary in order to be able to continue to use the Product on certain hardware. THIS PRODUCT IS LICENSED TO YOU, NOT SOLD.
As applicable, certain parts of the Product may be using third party features, some of which are managed by third-party providers for which additional terms and/or costs may apply. You must comply with such additional terms: for instance, if the Product is featuring a VoIP application, then You must comply with the associated wireless data service agreement when using the Product). Please review such additional terms and costs carefully.
1.2 You shall not, directly or indirectly (i) sell, rent out, lease, license, distribute, market, exploit the Product or any of its parts commercially, (ii) reverse engineer, decompile, disassemble, adapt, reproduce, or create derivate works of this Product (except if the Product enable You through a specific feature to create, generate or submit User Generated Content and for which You will need to create an Account and comply Terms of Use), in whole or in part; (iii) create, use and/or distribute “auto”, “trainer”, “script” or “macro” computer programs or other “cheat” or “hack” programs or software applications for this Product (whether in an online multiplayer game or in a single player game over the internet or in local area network); (iv) remove, alter, disable or circumvent any copyright and trademark indications or other authorship and origin information, notices or labels contained on or within this Product and (v) export or re-export this Product or any copy of adaptation in violation of any applicable laws or regulations.
1.3 While using the Product, You agree to comply will all applicable laws, rules and regulations. You also agree to comply with certain rules of conduct that govern Your use of the Product (“Rules of Conduct”), which are not meant to be exhaustive and can be modified at any time by UBISOFT. In all cases, You may only use the Product according to anticipated use of the Product.
For example purposes, and without limiting UBISOFT’s rights to take action against You, You may not:
a. create, use, share and/or publish by any means in relation to the Product any material (text, words, images, sounds, videos, etc.) which would breach of a duty of confidentiality, infringe any intellectual property right or an individual’s right to privacy or which would incite the committing of an unlawful act (in particular, piracy, cracking or circulation of counterfeit software);
b. modify, distort, block, abnormally burden, disrupt, slow down and/or hinder the normal functioning of all or part of the Product, or their accessibility to other users, or the functioning of the partner networks of the Product, or attempt to do any of the above;
c. transmit or propagate any virus, trojan horse, worm, bomb, corrupted file and/or similar destructive device or corrupted data in relation to the Product, and/or organise, participate in or be involved in any way in an attack on UBISOFT’s servers and/or the Product and/or those of its service providers and partners;
d. create, supply or use alternative methods of using the Products, for example server emulators;
e. spamming chat, whether for personal or commercial purposes, by disrupting the flow of conversation with repeated postings of a similar nature;
f. transmitting or communicating any material or content which, in the sole and exclusive discretion of UBISOFT, is believed or deemed offensive, including, but not limited to, language that is harmful, threatening, unlawful, abusive, harassing, defamatory, disparaging, obscene, sexually explicit, or racially, ethnically, or otherwise objectionable;
g. harassing or threatening any other users in the Product;
h. make inappropriate use of the help service or the claim buttons or send untruthful reports to members of UBISOFT’s personnel;
i. falsely claim to be an employee or representative of UBISOFT or its partners and/or agents;
j. falsely claim an endorsement in connection with the Product or with UBISOFT.
2. OWNERSHIP.
Why your screen just went black and white: Windows 10 color settings and color-blindness
UPDATE: I’m leaving the original post up, however the latest Windows update changes some of this around. The ‘Windows key-ctrl-c’ shortcut for setting filters is no longer enabled by default, and while you can still use the ‘right-click on desktop and select Personalize’ technique, in settings you now have to choose ‘Ease of Access’ to access these settings, which does make more sense. Additionally, high-contrast settings are where they’ve always been, but black and white / color-blind settings are now under the ‘Color filters’ option.
Here’s the new screen in settings, and the original post follows:
New Windows 10 color and filter settings
If you’re using Windows 10 and looking for a fix as to why your screen has suddenly gone black and white, or if it hasn’t and you’re looking simply to learn something new and interesting and fun (and what can be used as a cruel trick on your friends / acquaintances / enemies, but please don’t do that), try the following: Hold down the Windows key, then Control, then C. If your screen was black and white, problem solved! If it wasn’t, well, now it is. Do the combo again and you’ll be good as new. Spoiler: You can choose other visual settings for that shortcut; black and white is simply the default. More on that in a moment, and here’s the companion video I recorded for this post.
I’d also like to briefly talk about the importance of color. It is a vital tool in communicating information, although it should never be used as the sole communicator: if someone can’t distinguish red, a red sign will serve no purpose if there isn’t text that also communicates what’s up. But there is no such thing as a green stop sign or a red ‘everything’s ok’ light, and there is a reason for that. For you programmers, you know that you tweak the colors of your IDE to enhance readability and comfort. Never underestimate the purpose of color in design. Also, my Ph.D. was in this very subject so I’m especially passionate about it, as you can tell.

I don’t think so
But black and white? You may be wondering why something like this is even a feature. The reason is readability and accessibility, a primary focus of HCI, interaction design, and the larger field of human factors, and remember it’s not the only setting – it’s just the default. The point is to make the screen easier to see for those with visual impairments, particularly color blindness, but these adjustments can also be used by those who simply find stock Windows color settings to be too much. And let’s face it – sometimes they can really be too much.
It reminds me of the old Atari 2600 and it’s B*W / Color switch, which is as far as I can tell the first time a dedicated option was provided to select between one or the other. This wasn’t an accessibility issue, however, it was used because in 1977 black and white TVs were still quite prevalent, and using the black and white setting would adjust the contrast by switching the palettes used, thus making the game easier to see. Without that, in other words if it just switched to a standard black and white with no consideration given to their original colors, on-screen objects that were easily distinguishable in color might be very difficult to distinguish with just shades of gray. So the idea was the same, but the reason was quite different.
The image below shows the B*W / Color switch taken from one of our 2600 consoles in the gameroom here at UCI, while the other two screens show Slot Machine for the 2600, running in the Stella emulator, and how it displays in color and in switched black and white.
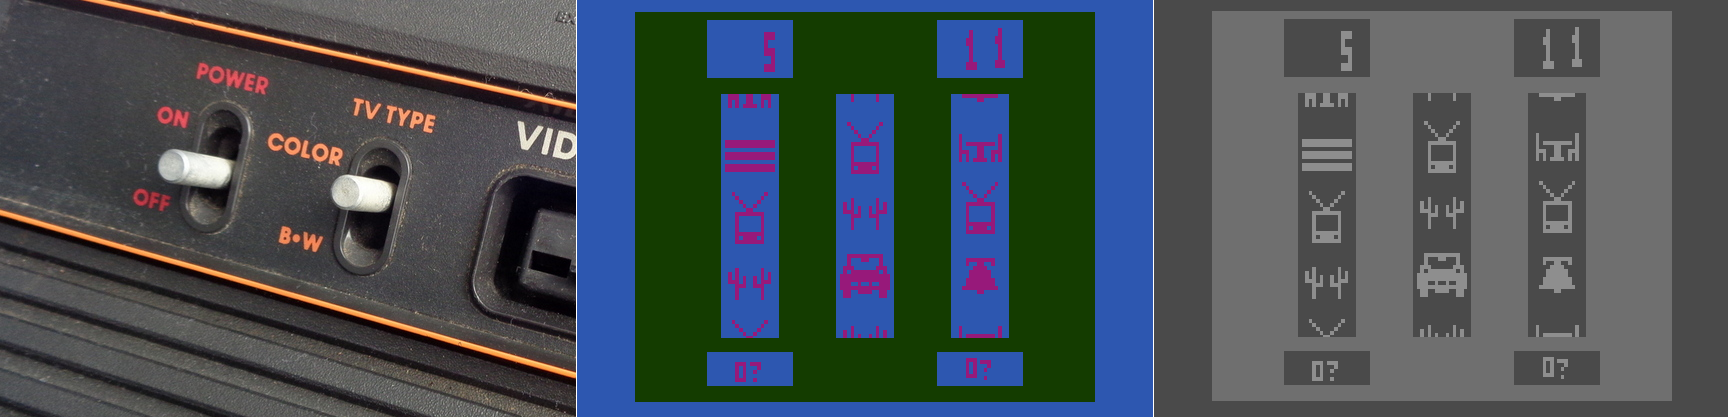
Atari 2600 Slot Machine in color and black and white
Yet that was back in 1977. With todays monitors having HD and 4K capabilities, why on earth would we need a black and white setting? There are several reasons, the most obvious being that black and white photography, which adds an ethereal, ageless quality to a photo, and in my opinion often requires the viewer to focus more on the content and composition of the image, is still very common today. However you can’t simply switch from color to black and white for the same reasons we had a switch on the old Atari; what works well and is easily distinguishable in color may blend into a single shade in black and white. No, unless you are shooting in black and white natively, and if you are you should use the RAW setting to get as much contrast and separation as possible, you have to convert an image from color to black and white, manually adjusting for all those settings that would have been done automatically otherwise. That’s one use for the setting in Windows. Of course, it’s possible that a user might have complete color-blindness, and even though that is extremely rare, it does happen: estimates are, for men, between 1:30,000 and 1:100,000 depending on type.
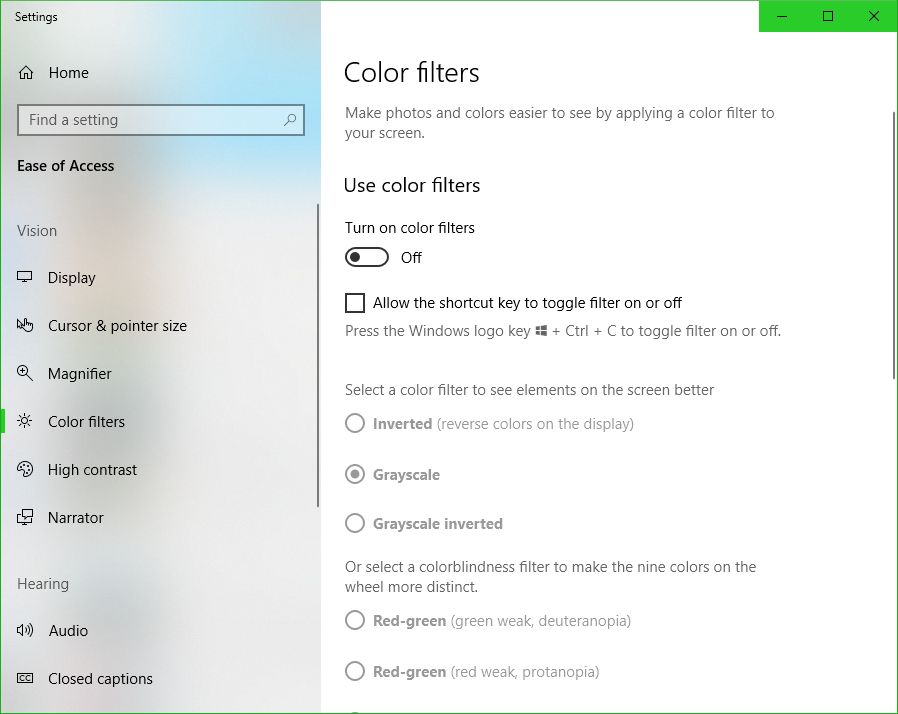
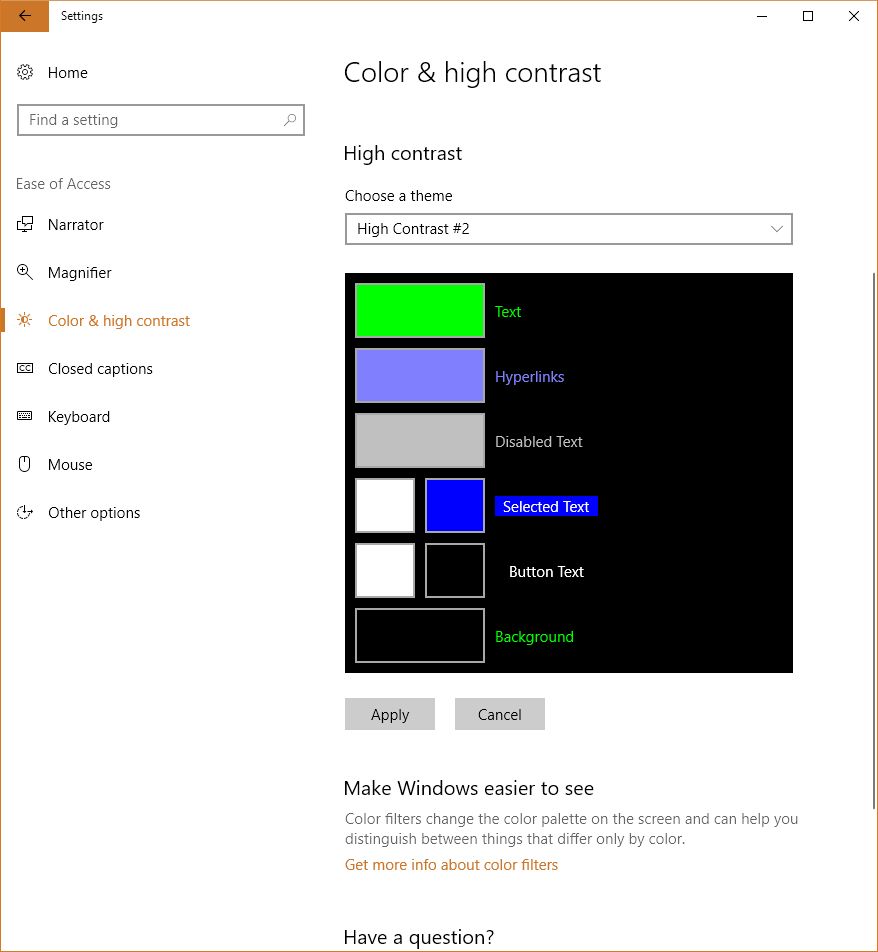
There is much more to this feature than simply switching between color and shades of gray, however. That capability in Windows is simply foreshadowing for much more important color-based adjustments that can be made. To see what they are, go into settings, select ‘Colors,’ (Alternatively: Right-click on your desktop and select ‘Personalize’), and scroll down until you see ‘High Contrast Settings.’ Click that, and whatever is selected under the heading ‘Choose a Filter’ is what will Windows will switch to when the shortcut Windows key – Ctrl – C is pressed. You can see the choices below.

High contrast settings

Color filters
So what do these do? The first three should be obvious; grayscale converts to shades of gray, or black and white informally, ‘Invert’ inverts the colors on the screen, although what ‘Invert’ actually means cans be complicated. Factors to consider include whether you are using RGB or CMYK color standards, the former being additive and the latter being subtractive, and what you’re trying to invert. Normally, when colors are inverted they are switched to their Complementary Colors, which are those opposite each other on the color wheel and offer the highest contrast to each other, although that high contrast can be a nightmare for text (red and green are complementary on a CMY color wheel, for example), so always consider application and the color scheme you’re using.
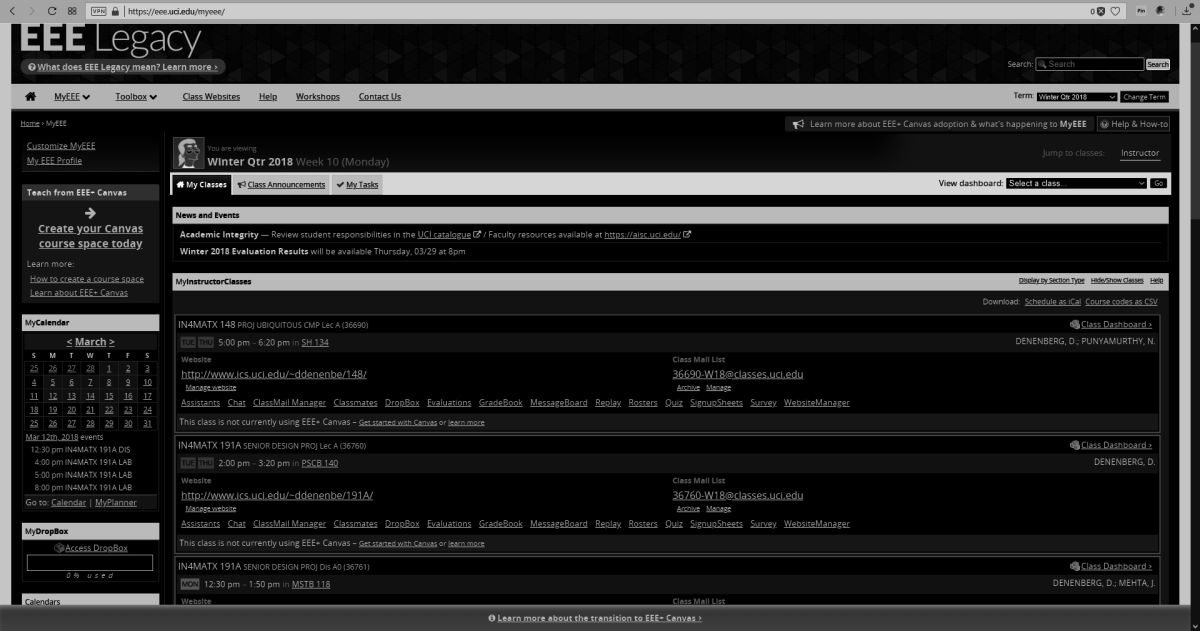
I’ll be using UCI’s EEE page as I see it to show what these selections do, since it has an interesting combination of colors including various shades of blue and yellow which are sort-of-but-not-quite complimentary, my avatar has red hair, the ‘Learn about’ box in the upper right is green, and if you look closely you can see the ‘MON’ in the lower left is a shade of orange.

EEE in its natural state

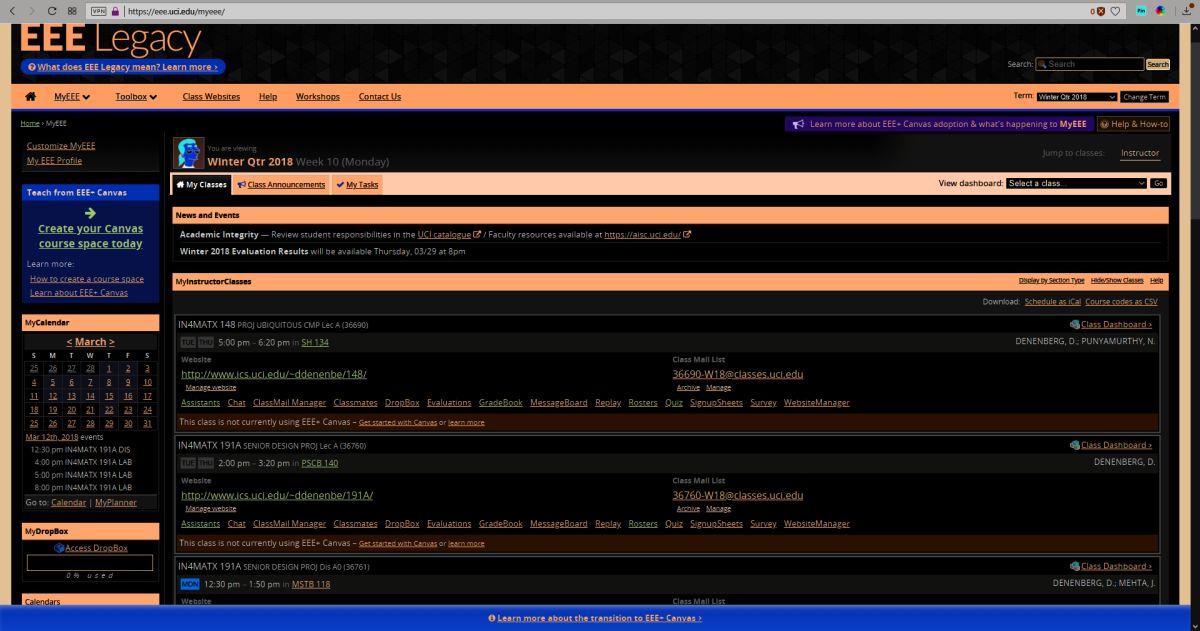
EEE with Windows color filter set to ‘Grayscale’
EEE with Windows color filter set to ‘Grayscale Inverted’
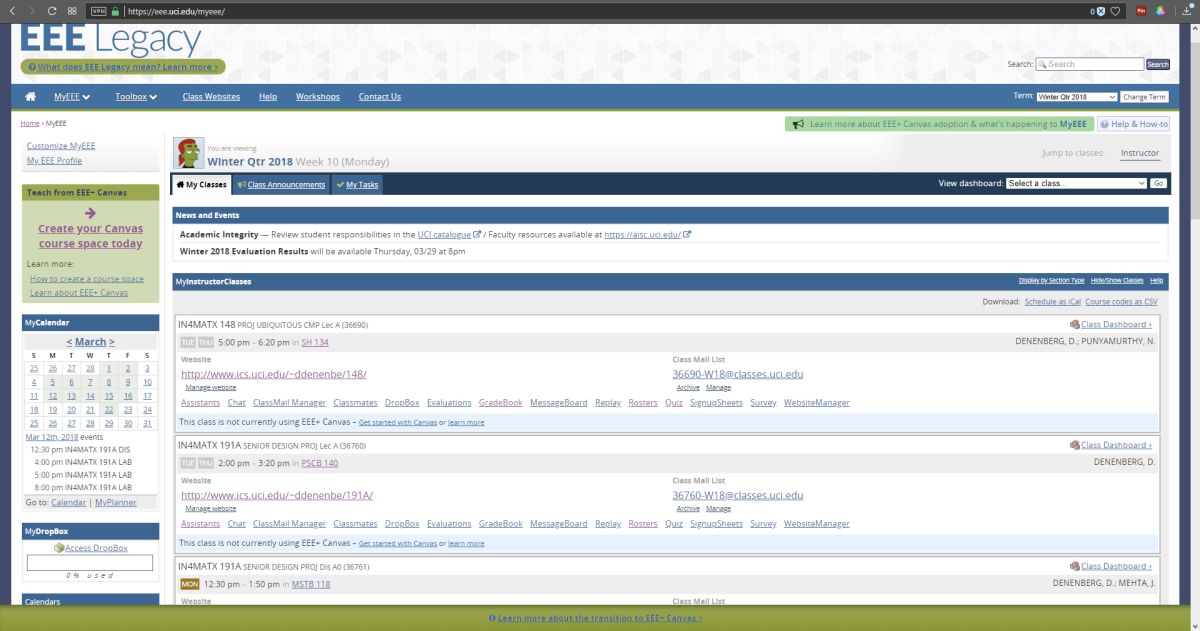
EEE with Windows color filter set to ‘Inverted’
As you can see, these allow a user to change the color scheme to fit their particular needs for viewing web pages or images or whatever, however it is the next three options that deserve our attention, as they are a cornerstone of accessibility and design in the user interface and HCI in general.
If you look back at the earlier image showing the filter options, you’ll notice the last three are ‘Deuteranopia,’ ‘Protanopia,’ and ‘Tritanopia.’ These are types of color blindness – a term that I really don’t like even though it’s accurate – that affect someone’s ability to process colors. We also need to distinguish between some terms here, as they are often, at least from my experience, misused. All of these conditions can manifest in two primary ways: -opia and -omaly. The former, which are the ones indicated in Windows’ color settings, mean you are missing the related cones altogether. In other words, Deuteranopia is a complete lack of red cones (known as L-cones, for long-wavelength), Protanopia is a complete lack of green cones (known as M-cones, for medium wavelength), and Tritanopia is a lack of blue cones (known as S-cones, for short wavelength). The latter is a form of blue-yellow color blindness, although Tritanopes don’t confuse those two colors so it’s not an appropriate name, while the former two are versions of red-green color blindness.
In contrast to the previous circumstances in which the cones are entirely absent, it’s also possible that the cones are present but weak to a particular color stimulus; those cases use the ‘-omaly’ suffix. So Deuteranomaly is a weakness to red, Protanomaly is a weakness to green, and Tritanomaly is a weakness to blue, and very rare; about 1:1,000,000. But the cones are not missing as they are in the previous cases; they are simply weak or mutated. Therefore, one way to address it is to increase the amount of or saturation of the color in which a person is weak, although this in itself is not a complete solution. Additionally, how these manifest in someone’s vision can be wide-ranging, from little impact on color-vision to something very close to the -opia variant.
These types of color deficiencies can cause real problems in distinguishing elements in any visual field, especially a computer screen. Research into accessibility has not only been ongoing for many years, but guidelines for the use of color are in place for all large companies such as Microsoft, Apple, Google, and all the way to the U.S. Government (Usability.gov is overseen by the Department of Health and Human Services, by the way).
So in returning to the color / filter settings in Windows 10, I can’t say with certainty whether Microsoft actually means, for example, Deuteranopia, as indicated, or Deuteranomaly, or is using it as an umbrella term. They aren’t the same, and can only be addressed as such through design to a certain, limited extent, but there aren’t separate settings so…I don’t know.
When switching among these filters on EEE, there was no impact as there is no red or green, however there was a noticeable effect when applying the ‘Tritanopia’ setting, as that refers to an absence of blue cones. As you can see, the yellow sections were switched to green, which makes sense as Tritanopes have generally normal red-green vision.
EEE with Windows color filter set to ‘Tritanope’
For the Protanopia setting, a good example to use instead of EEE is IS301.com itself. because this condition results in a weakness to red light, and IS301 has a strong red background, the setting reduced the saturation of red in all elements on screen for a noticeable change.

IS301.com with Windows color filter set to ‘Protanope’
When set to ‘Deuteranope,’ the only change was an increase in saturation of the red elements of the screen, but nothing dramatic.
I also want to mention that you can set up your own high-contrast color themes, tweaking the color for every aspect of the display so it fits your needs perfectly; there are a lot of options for configuration.
Prebuilt but editable contrast themes
On the other hand, apps and programs and everything else have to be designed with that in mind or else they will be negatively impacted by your adjustments, and that results in another problem: Windows will natively adapt to your specification, but it doesn’t mean any of the programs you run under Windows will. That’s something that needs to be enforced more clearly and strictly in Microsoft’s design guidelines.
So what was s simple fix of a black and white screen turns into a deep dive about accessibility and color blindness – I love it when that kind of thing happens. If you just wanted to fix your screen, then you’re not reading this anyway, but we really need to be aware, especially software and interface designers and developers, that for usability and accessibility these options and many others need to be available so everyone can benefit from the functionality your software brings.
On a related side note for those who may be reading and and are living with color-blindness, I discovered that there are glasses that claim to fix the problem. Apparently they create a bespoke filter on the lens for your particular condition and severity, and can bring you to almost normal. I’m not affiliated with the company, I have no idea how well they work, but for the cost they’d better work pretty well. if your’e interested, the company is called EnChroma. If anyone tries them, let me know how it goes!