
Tag Archives: Virtual Reality
Importing 3D models into Oculus Home from Sketchfab
A couple of weeks ago, I posted a video about importing items from Sketchfab, a site that hosts 3D models people have created, into Oculus Home. I meant to put up a companion post to that video, but as sometimes happens I was busy, and so the post didn’t go up as quickly as I’d hoped. Luckily, I recently had a five-hour flight from the east coast with many delays due to weather, and was able to start writing it up, and now that I’m back home there’s some time (but not much) to power through and finish. If you just want to see the video, it’s at the end of this post and linked earlier in this paragraph.
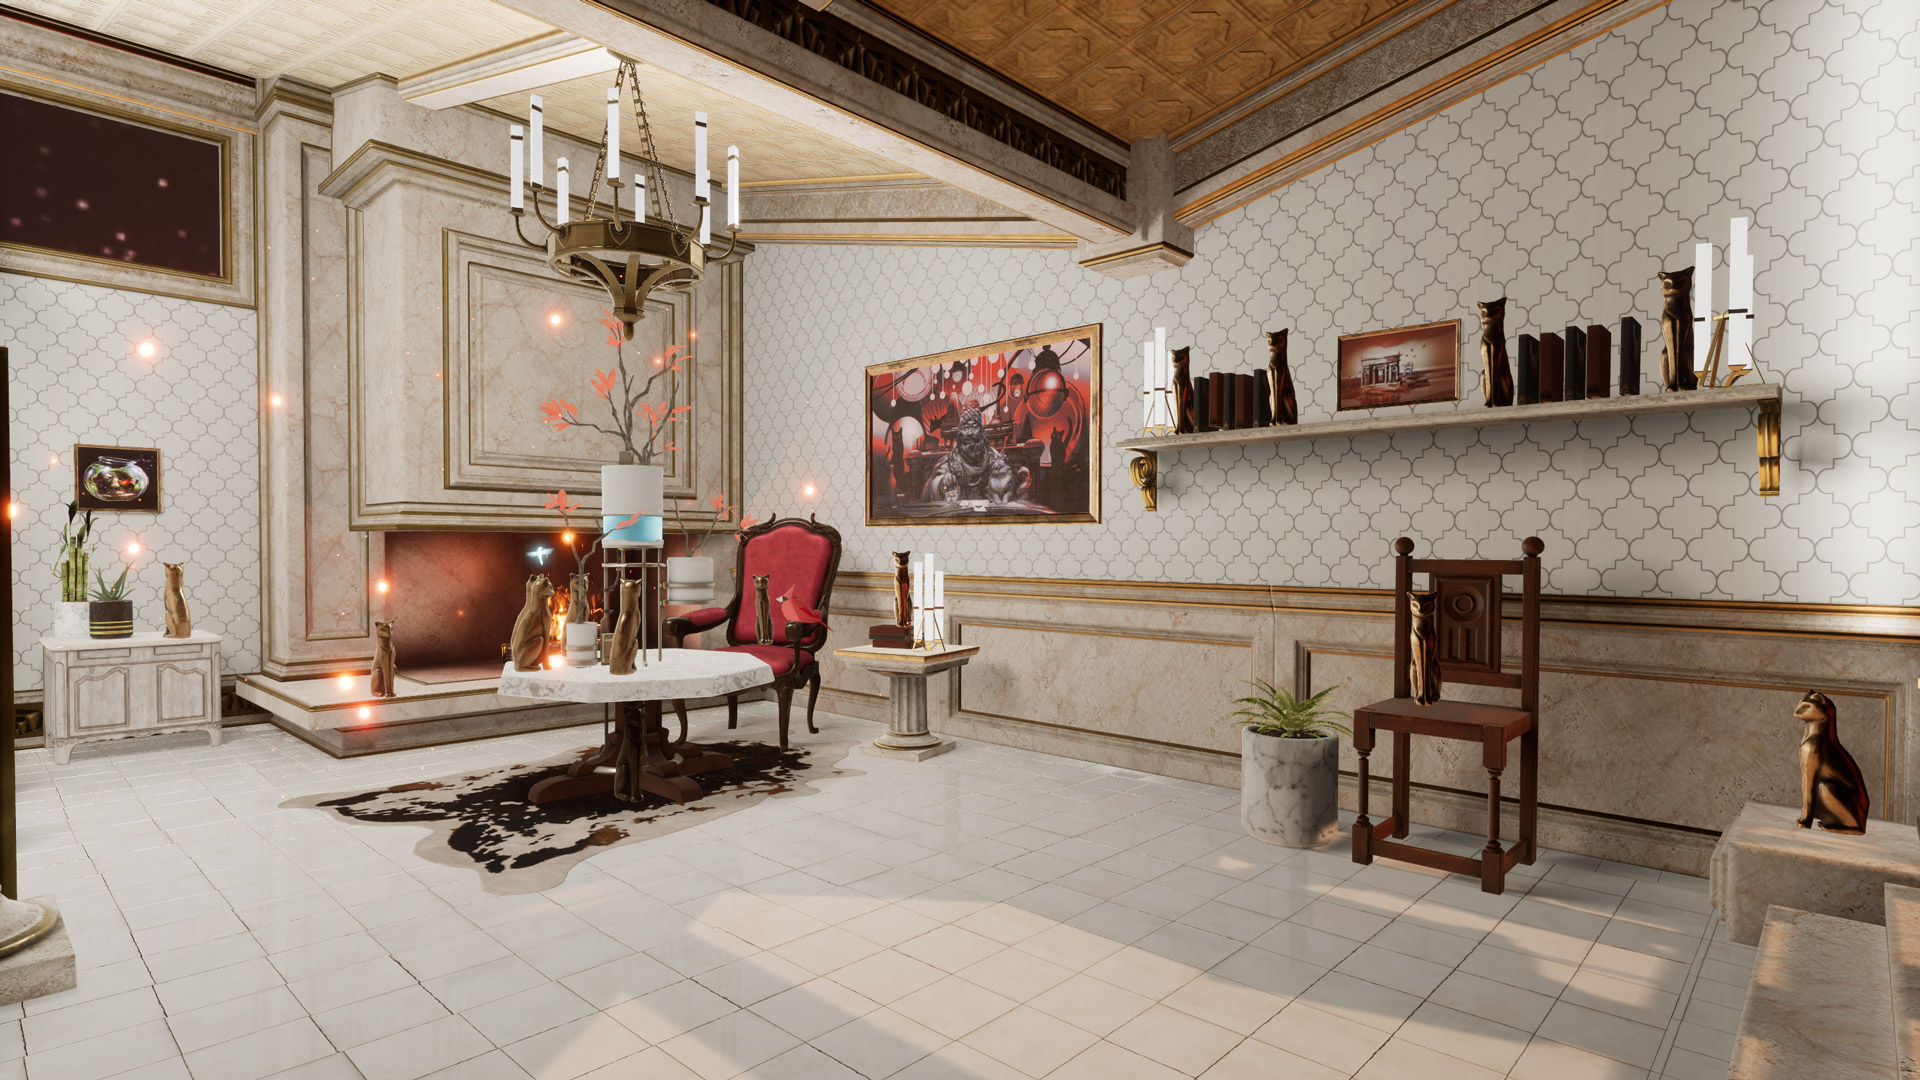
For those not familiar, Oculus Home is a personal space, sort of like an apartment, that appears when you first boot up the Oculus Rift headset. For a long while, Oculus has provided a wide range of additional items you could use to decorate your space, everything from furniture to suits of armor to completely new environments such as a gothamesque city or outer space. Even with all of that, one of the main requests users had over at the Rift Suggestion Portal was to be able to create their own objects and import them into their virtual living space. Here’s a crappy picture of an earlier version of my Home, taken off YouTube from this article’s companion video.
Oculus Home
(Side note: In the video I discuss the texture loading issues and choppy performance, however a Dash update released a week later fixed it all. No more issues!)
About a month ago, Oculus delivered. You can now import items created in some of the virtual modeling programs available on the platform such as Medium, as well as from website Sketchfab, and it is the latter that really opens up the possibilities. Because people can upload models created using any tool, there is a wide variety available, although be warned that as is the case with anything else, when the public can upload their own creations there are some that are of the NSFW variety. Also, some models must be bought, but there are many free ones as well.
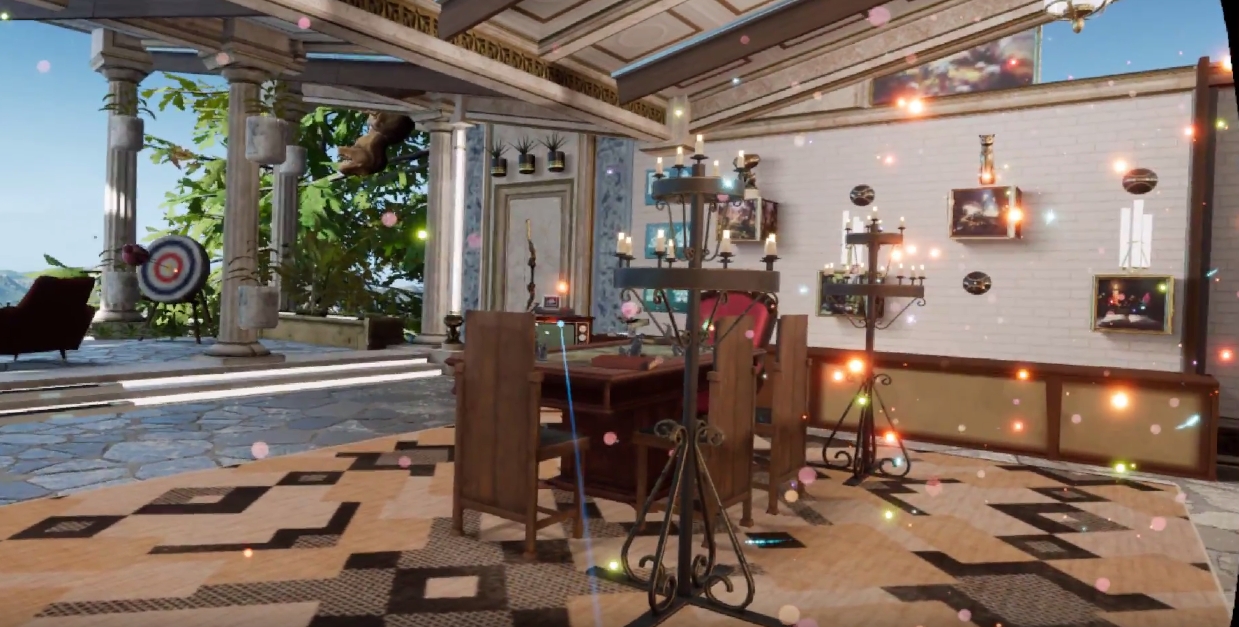
Another nice thing about Sketchfab is that you can manipulate the objects in your browser before downloading, so you can get a very good idea how they will look in your 3D environments. It also holds developers to a standard to not cut corners on, say, the backs of things (which modelers will sometimes do if they know the object will be placed against a wall, for example – in fact, games simply don’t render what can’t be seen at both the object and world level!) and develop the whole thing completely. As with anything, quality varies, although I was, for the most part, very pleased with what the site offered. Also be aware that not all models are available for download, such as the notable ‘Old Truck and Gas Pumps‘ and ‘The Pumpkin House‘ seen in the screenshot below, but most smaller, decoration-style models are.

Some Sketchfab models
Importing models is not an overly complicated process, however there is an issue with scaling. Many objects you will import will be far too big to fit in the space, and will need to be scaled down. Because Oculus does not allow for scaling within Home itself, a third party tool is needed to do the scaling and there’s no way to determine whether the object is properly scaled other than to import it and test it in the space. If it’s too big or too small, you’ll have to go through the process again. My hope is that Oculus will soon allow for scaling within the Home environment itself. Until then, we have to do it the hard way.
So, we will first find the object we wish to import, scale it, then import it.
In the video, I imported what looks like a file cabinet that would be found in post-apocalyptia (remember Three-Dog?) or a building from the zombie apocalypse. It adds a nice yet subtle, creepy flair.
I found the model by doing a search for free downloads, but you can find the specific one in the video by searching for “Rusty Metal Cabinet” or simply click here. I should mention that if you decide to do the search and see what else is available, ‘Cabinet’ is misspelled for this particular model on Sketchfab, but you’ll find it anyway.
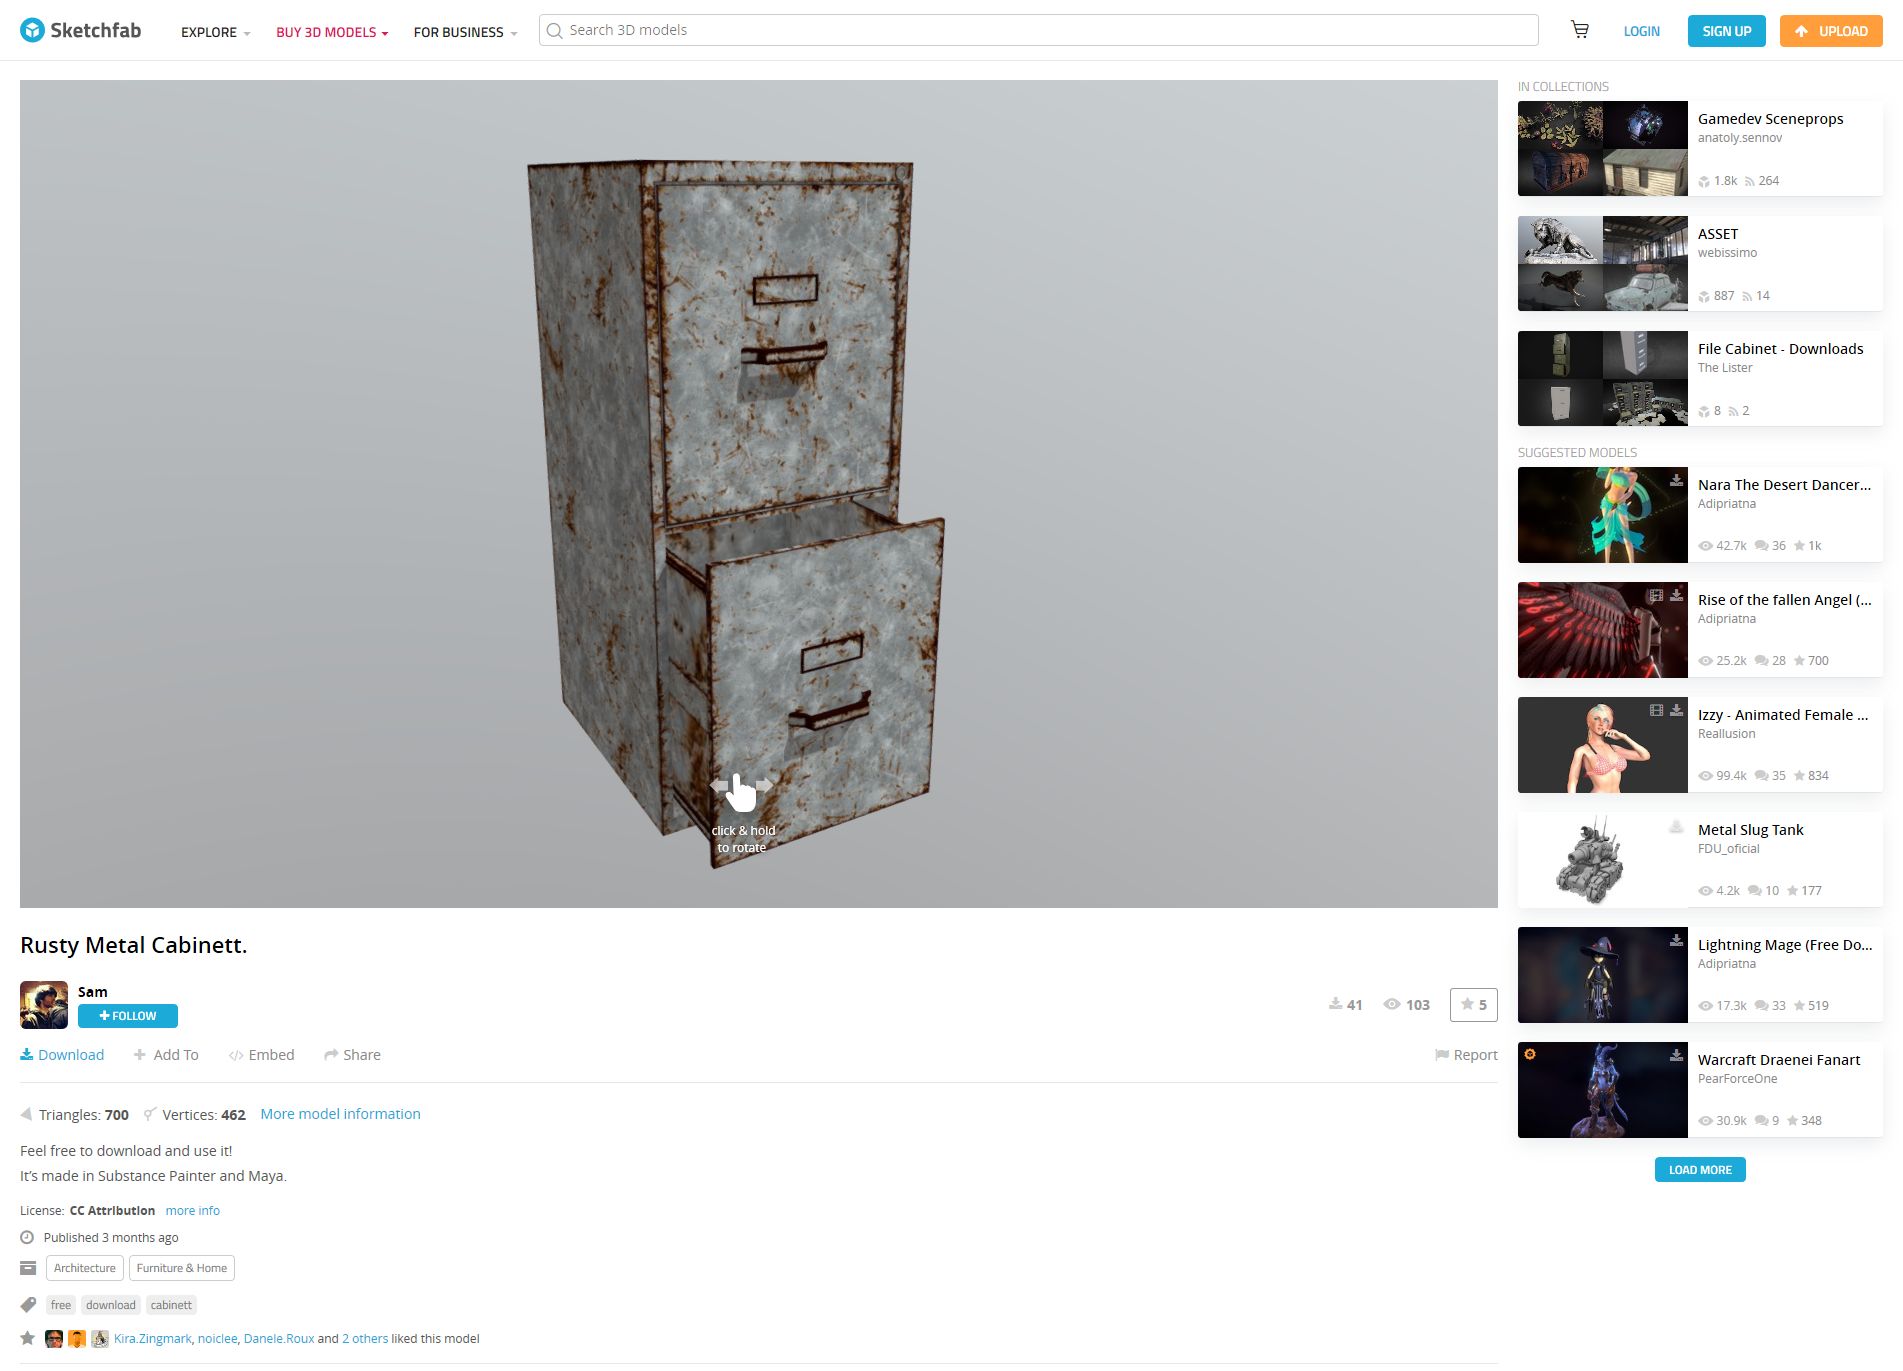
Rusty Metal Cabinet on Sketchfab
Once you have found it, you can rotate it and view it from all angles right in your browser, and when you are ready to make it yours just click on the blue ‘Download’ link under the author’s name, right under the model itself.
Downloading is the big catch here: When the download dialog appears, you want to be sure to download the ‘Autoconverted format.’ That glTF format is an open-source method for the interchange of 3D models for use in applications other than those in which they were initially created. What that means is, the format can be exported to the format we need for importing into Oculus Home, while the ‘Original Format’ will be for the tool used to create the model itself, whether Blender or 3DSMax, or whatever, and that’s not what we want.
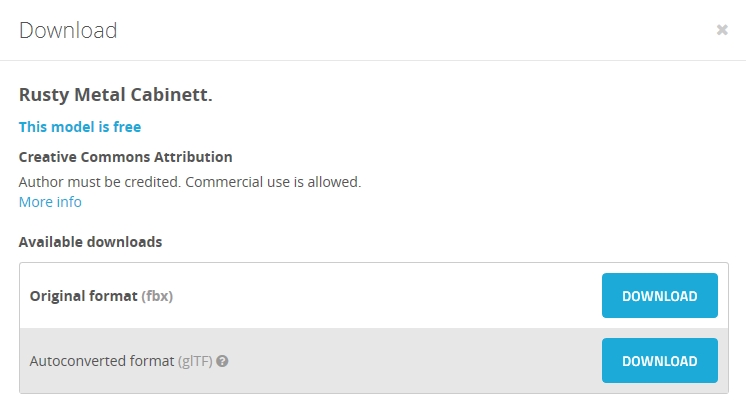
Be sure to download the ‘Autoconverted format” option
Once downloaded, export the zipped file so you have the folder with associated files inside it. I use 7-zip, which for me is the easiest, provides the most control and options, and integrates nicely into the context menu. Their website, however, leaves much to be desired. However you extract it, once you have the resulting folder, open it up so you can see the ‘Textures’ folder, along with ‘Scene.bin’ and ‘Scene.gltf.’ Then, bring up https://glb-packer.glitch.me/ and drag all three of those onto the page: The folder, and the two Scene files. You don’t have to do anything else, it will automatically convert then download a file called ‘glb.out’ that has all you need. Because it generates an .out file, we know it’s a binary compaction of the original files and folders into a single file.
It couldn’t be easier. Seriously, this is the whole page, and if converting to GLB there’s nothing to do!

GLB packer. This is it.
Of course, that easy step shouldn’t lull you into a false sense of complacency, because now it gets cumbersome. You should have, in your Documents folder, an Oculus Home folder, then an ‘_Import’ folder, and you can make the _Import folder if it’s not there, but don’t forget the underscore! Rename your ‘glb.out’ folder to something that makes sense, for example in the video I renamed it to ‘RustyMetalCabinet,’ and drag it into the ‘_Import’ folder.
For now, that’s it! Go into home, check in the ‘My Imports’ tab of your inventory, and you will see it there just as you named it. Bring it into home, and…it will likely be way, WAY too big. And that means it’s scaling time, which is easily the most tedious part of the process; all you can do is scale it, hope it’s right, then re-import it back into Home. If it still isn’t the right size, you’ll need to do it again. Come on Oculus, let us scale in Home!
Anyway, to scale the object, you’ll need to bring up the threejs.org/editor site, drag your .out file onto it, then scale by clicking and sliding your mouse over the ‘Scale; numbers on the right-hand side, as you can see in the video and image below, then selecting ‘Export .GLB’ from the file menu. The problem is, there’s no real way to know how the thing scales regarding your particular Home: It could be too big, too small, all you can do is re-import it and check it, then do the scaling over again if it doesn’t fit. For example, I ended making a teensy file cabinet before I got the size right. I kept it anyway, though; it was neat, in it’s way.
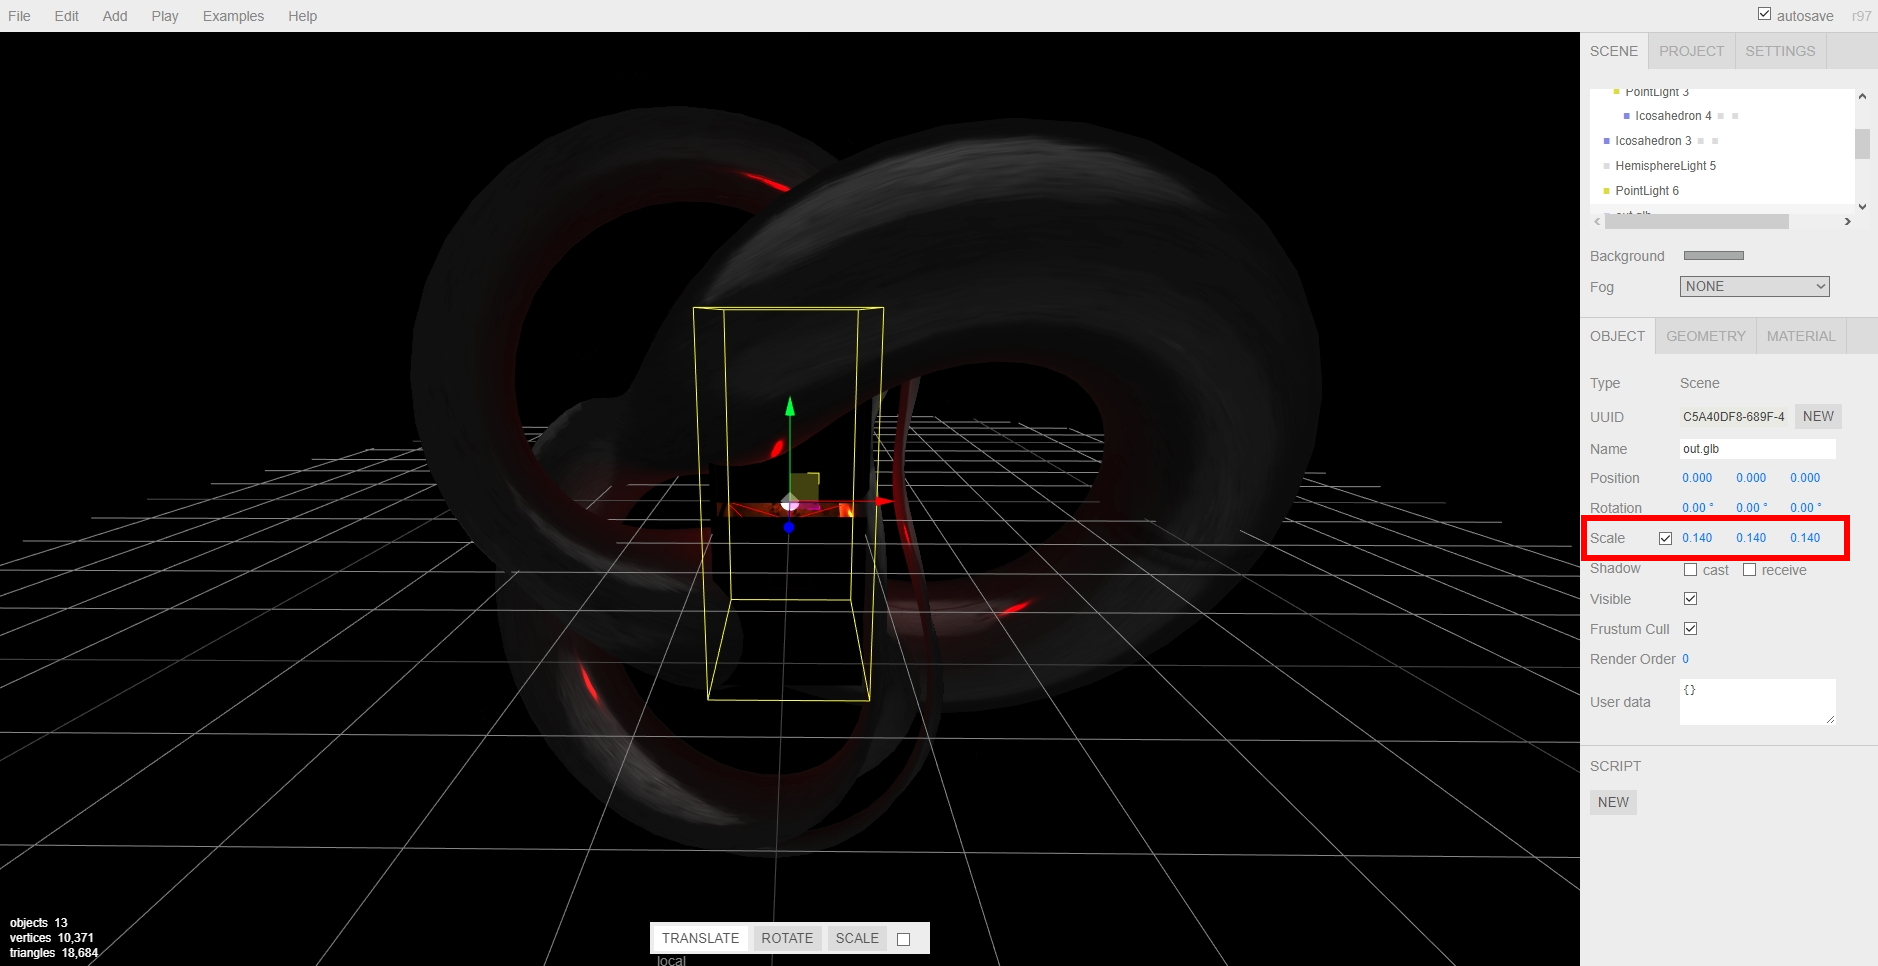
Adjusting scale in the threejs editor
Then, once you have found your scale, you’re all set! Another neat thing about doing this is that when imported models load into your home on startup, the do this futuristic materialization, like they’re being 3D-printed by light, into existence. It’s a really nifty effect.
So there you go! Have fun, there is a huge number of models to choose from, the recent Oculus update has fixed most of the performance issues, so the possibilities are almost endless! If we can just get scaling, perhaps even direct import, the icing will be on the cake, but until then, it’s still pretty fun.
Here’s the video:
Just like old times: Running console emulators and PLEX on the virtual flat screen TV in Oculus Home
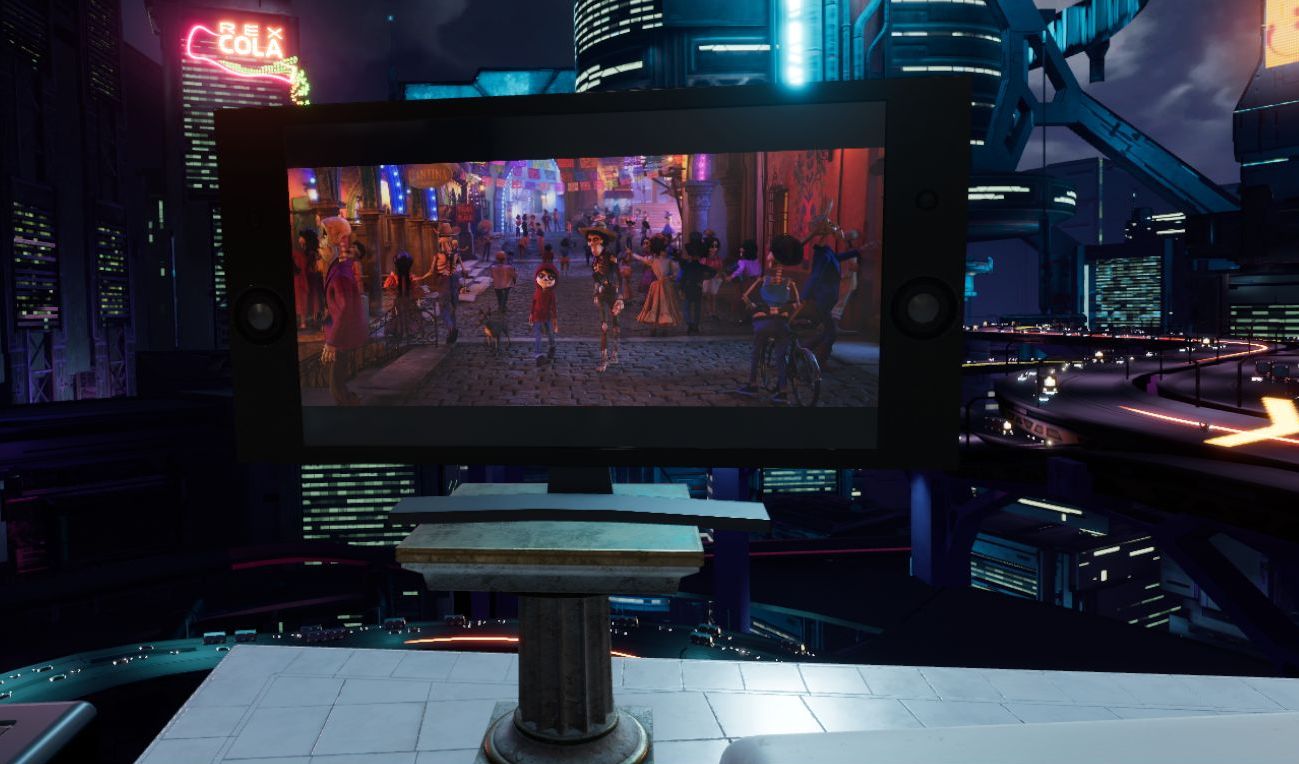
A couple of months ago, Oculus introduced a few flat-panel TVs (and a desktop monitor) into Oculus Home. That would have been fine in and of itself, however these TVs can have ‘panels’ embedded into them. Panels are essentially windows from your desktop, so if you had Word or Plex or chat or even a game session open, you could have it appear in a TV or monitor in your virtual home.
Naturally, my first instinct was to fire up one of my retro-console emulators and see if I could have it run by projecting it through one of the TVs in the virtual space. It’s almost a meta thing: Playing a classic console on a flat-screen TV in a virtual environment via VR. If it worked, since Oculus allows you to place as many of these as you wish, I could set up the custom gaming room of my dreams. I am happy to report it worked perfectly, and I am in the process of designing that gameroom right now! I’m thinking futuristic city as the backdrop, but we’ll see.
PLEX, which is movie-playing and streaming software for your personal media collection, also ran beautifully with no lag, and I’ll talk a little about that towards the end.
Before I get to the results, let’s talk about emulators. Emulators trick your system into thinking they’re the console they’re emulating, and I mean that they really trick it. Whatever shortcomings the console itself had, so will the emulator (and possibly a few more, but we’ll get to that). If a bug appeared in a game, or the console just quite wasn’t fast enough to push a game, that will be replicated during emulation. Atari 2600 emulators will even show racing the beam errors, in which the next line of video won’t be drawn if the emulator is still carrying out logic operations. In the following image, which shows The Empire Strikes Back for the Atari 2600 running in the Stella emulator (Stella was the code name for the console during development), if you look closely you’ll see black lines down the left hand side of the image: Those are racing the beam errors, even though it’s not a CRT and not even a console! The point is, when you’re emulating, the systems is the console.
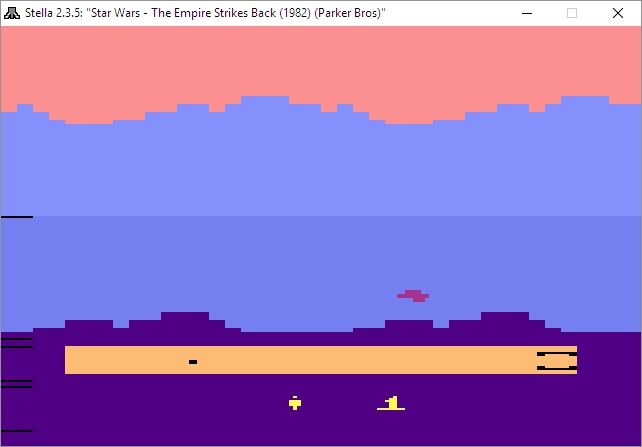
Racing the Beam errors in the Stella emulator
Not only that, the games are actually the games, not some reprogrammed nonsense. An ISO, for example, is an exact bit-level copy of digital media, so someone will put the original game disc into their PC’s optical drive, or sometimes they’ll use the console itself with special connections, and use special software to turn that disc or cart into a file. Other times, the ROM chip itself will have to be ripped using a ROM (EEPROM) burner.
The point is, with an emulator, you’re getting the actual console experience with the actual games and all their flaws or lack thereof, not some hokey recreation. It also means some games may not work all that well, or at all, but that’s rare.
Generally, emulators are not terribly difficult to set up and get running. Each has its own quirks, but once you start experimenting you’ll be hooked, not to mention surprised at (generally) how well they run.
I use many emulators, and I’ll give you a crash course on setting them up. All you really need to know is that you need to specify a folder that contains your games, and you can call the folder anything you want: Whenever I set up a folder I’ll call it either ‘Games’ ‘ROMs’ or ‘ISOs,’ but you can use anything. Speaking of the games, those files can come in several forms: Some emulators allow for zip files in the games folder, others will require an .iso, .bin, or possibly other, specific file such as .gcn which is for the Nintendo GameCube. Some can use whatever you throw at them. Additionally, for the later consoles, you’ll need a BIOS file in your games folder as well, and they can generally be found with a low-effort web search, as can the games themselves.
Here’s an example of how the directories work, and these are almost always assigned during setup, although you can certainly set it through the options as well. For clarification, I run mine from a network drive, which is nice because I can save a game and then pick it up again from any PC in the house, or on the planet. Speaking of game saves, the emulators take care of setting up memory cards for saving games as well, however you can also create ‘Save States’ at any point in a game regardless of how its save structure is set up. So if you have to leave or otherwise shut down the emulator but haven’t reached a checkpoint, you create a save state, then load that instead of the save from within the game itself. You’re essentially saving the state of the emulator, not the game.
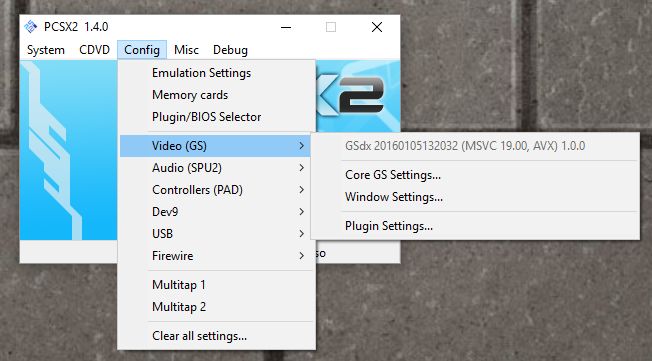
Here’s an example of setting up the games directory: In the image below, in image ‘1’ in the upper left, you can see I have an ‘Emulators’ folder, and after opening that, in image ‘2,’ top right, I am selecting the PCSX2 folder, which is a PlayStation2 emulator. Then, in image ‘3,’ lower left, I have created a folder called ‘Games’ where I keep all game files, and finally the last image shows the .iso and .bin files that represent that games I have for that emulator. On the other hand, my Gamecube / Wii emulator, Dolphin, has a folder called ISOs where I keep all my games, even though not all of them are actually .isos.
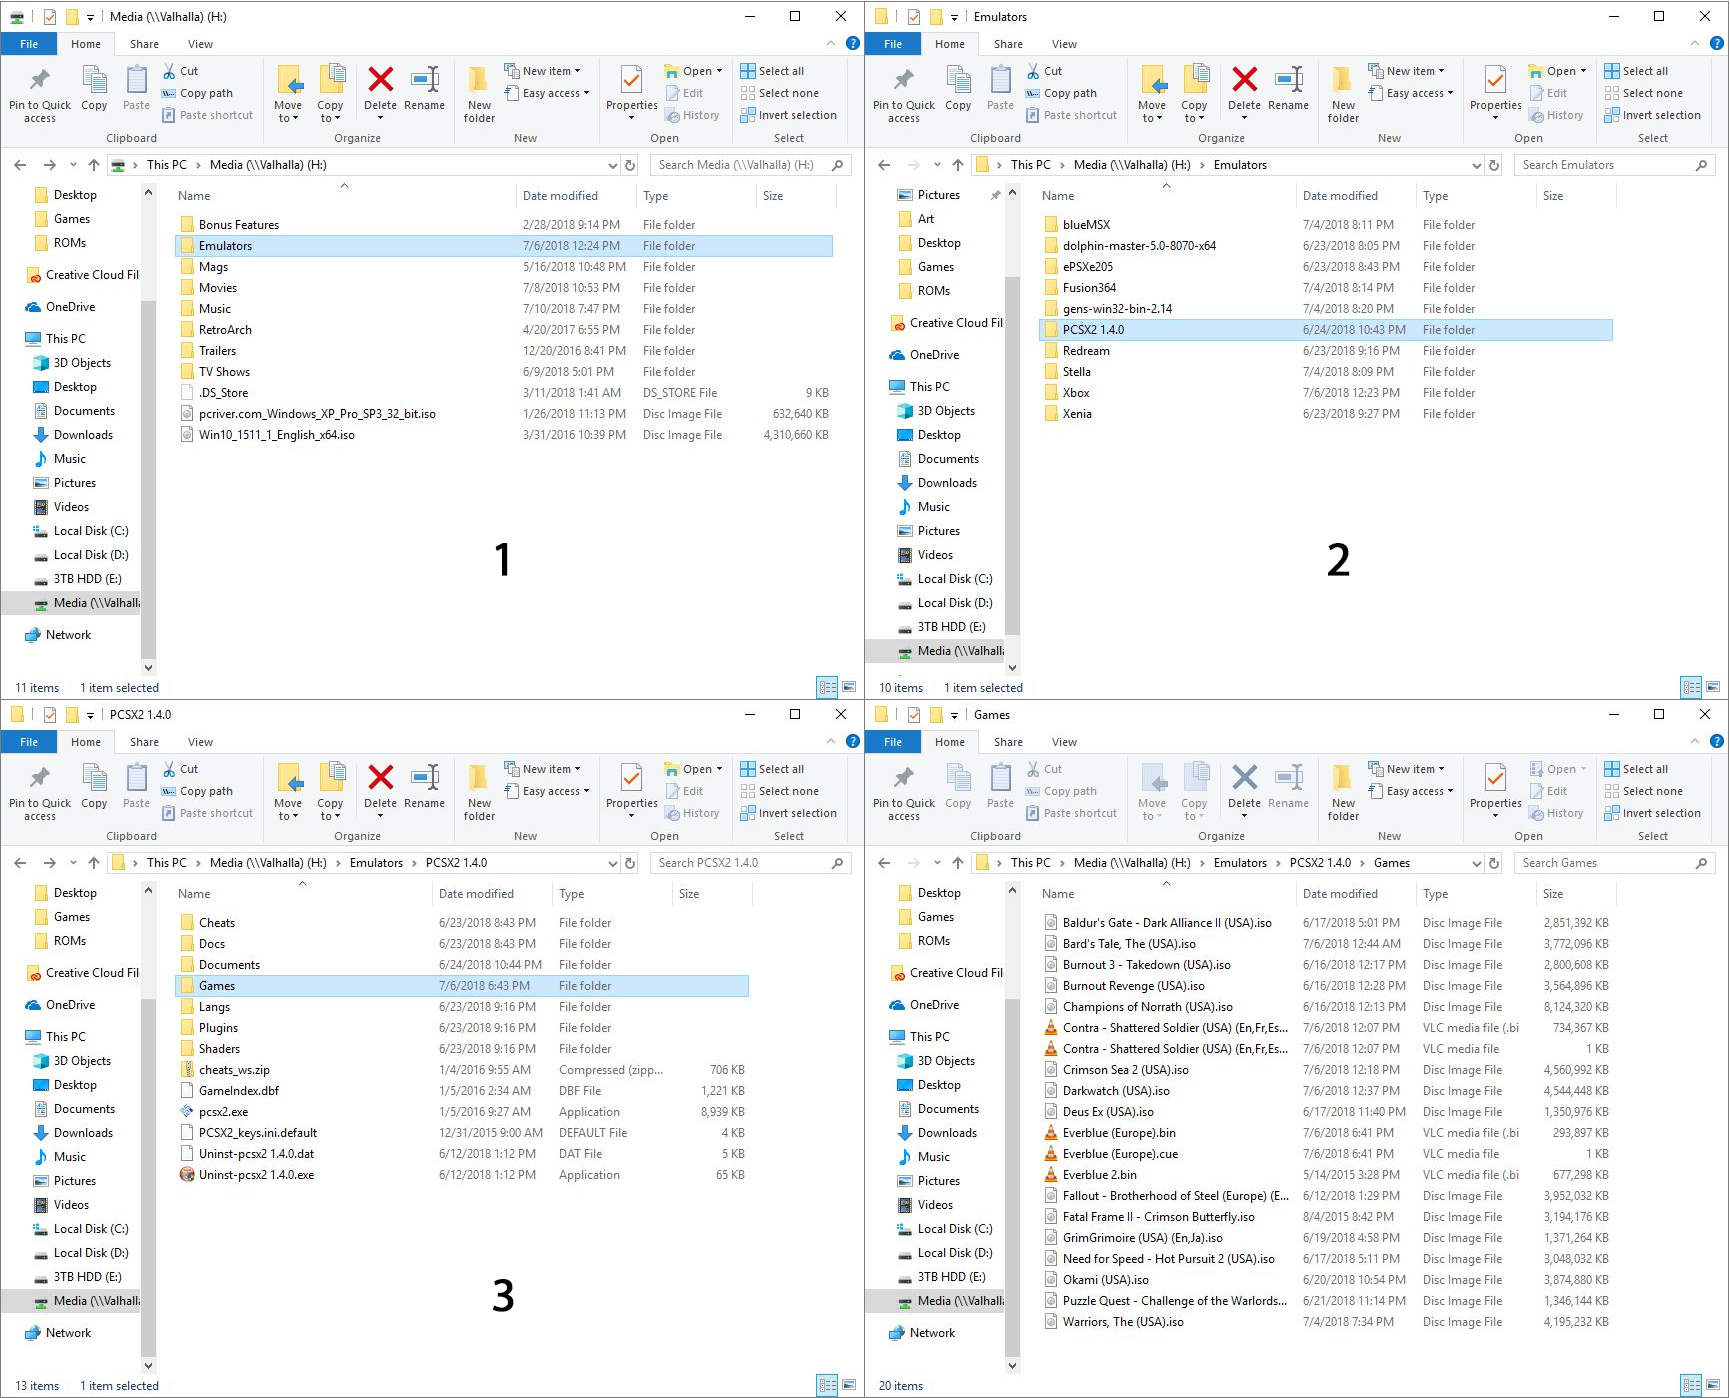
Directory structure for the PCSX2 emulator
The next big thing is that I have an XBox One controller connected to my PC, and any controller you use has to be configured. The initial controller setup, although straightforward, can be moderately time-consuming, but you should only have to do it once. For most emulators, you’ll need to go through and indicate which button on the controller does what, and you do that by clicking on each function in the emulator, then pressing the button / pulling the trigger that you’d like to assign. Below are images of the PCSX2 controller configuration screen, and underneath that the Dolphin controller configuration screen, and you have to click on each function then press / pull the corresponding control on the controller itself. Once that’s done, controls should be all set. Ultimately, it’s a really nice way of doing it because you can set the controllers any weird, wacky way you’d like.

PCSX2 Controller Configuration dialog

Dolphin Controller Setup
The only other major issue you are likely to run into is the graphical settings. Older consoles weren’t designed with 4K TVs in mind, many never even considered widescreen! Although most games will work fine, each emulator will have its own peculiarities when it comes to this, and they all offer EXTENSIVE graphics customization. PCSX2, for example, allows you to use OpenGL, Direct3D9 or Direct3D11, and it’s fascinating how a game won’t run under DX9, but will run perfectly under DX11, or vice versa, and I have seen many variations on that. I also, for that particular emulator, set resolution to at least 2x native; then it will run surprisingly well even on a widescreen 4K TV. And of course, it allows you to customize graphics for the emulator in general, as well as specific tweaks for the renderer you choose.
PCSX2 configuration menu

PCSX2 renderer selection and tweaking
When it comes to actually selecting a game, some emulators are more user-friendly than others. Prettier, I guess I should say. PCSX2 only offers up a straight file selection window, while Dolphin and ReDream, a Dreamcast emulator, provide lovely selection menus. Being an HCI person I prefer that, but the PCSX2 barebones method works just as well.
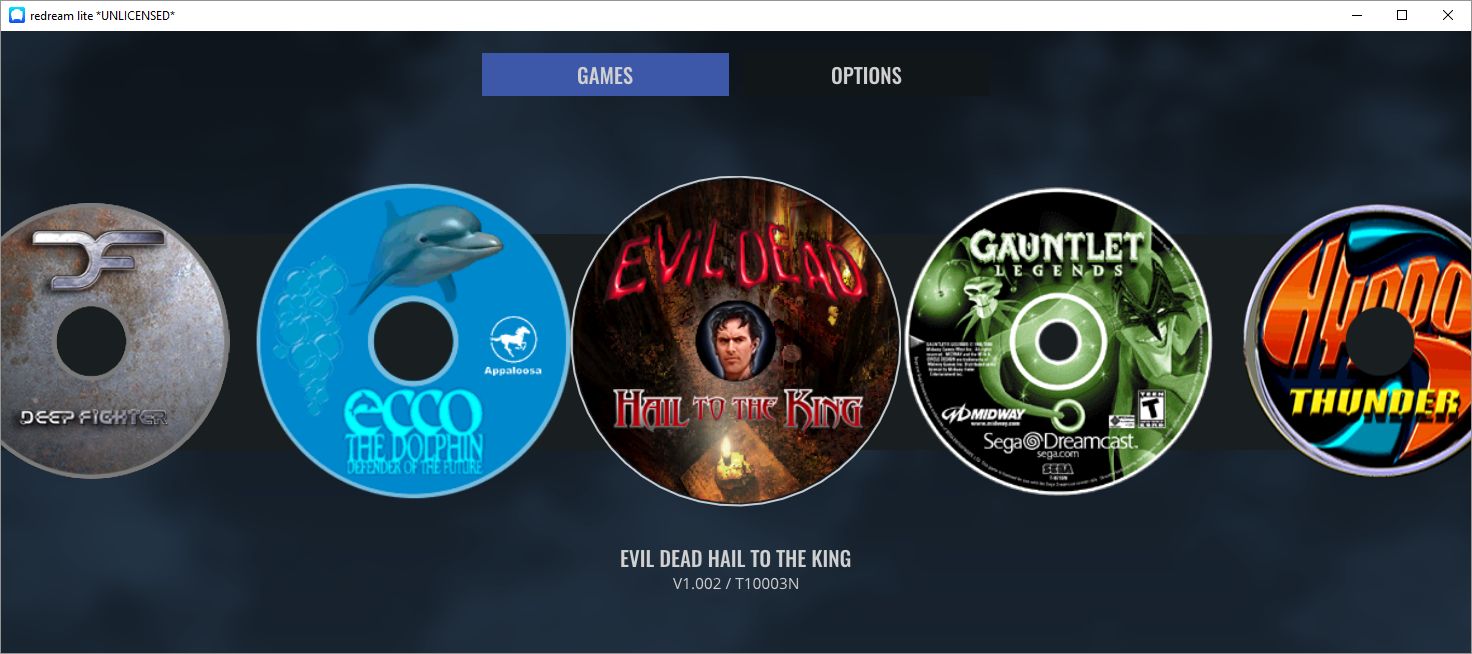
ReDream game browser

Dolphin game browser
So now that we have the details out of the way, what about running them on the TVs in Oculus home? I’m glad to report it works perfectly! There is, however, one big caveat: You can choose to embed the emulator window that’s displaying the game, however the window won’t be listed as a panel if it’s fullscreen, so you’d have to window the emulator on the desktop, then embed the window, then maximize it on the desktop. The better choice is to fullscreen the emulator window then embed the desktop itself. If you do that, it will work perfectly, with no lag (either visual or input), no jitter, no performance hit. For PLEX and even for a couple of emulators, if they’re fullscreen, Oculus Home won’t recognize them anyway so you’ll have to embed the desktop no matter what: It’s just a better all-around option.

Panel selection
It also works for running MAME through the arcade cabinet, as seen below:
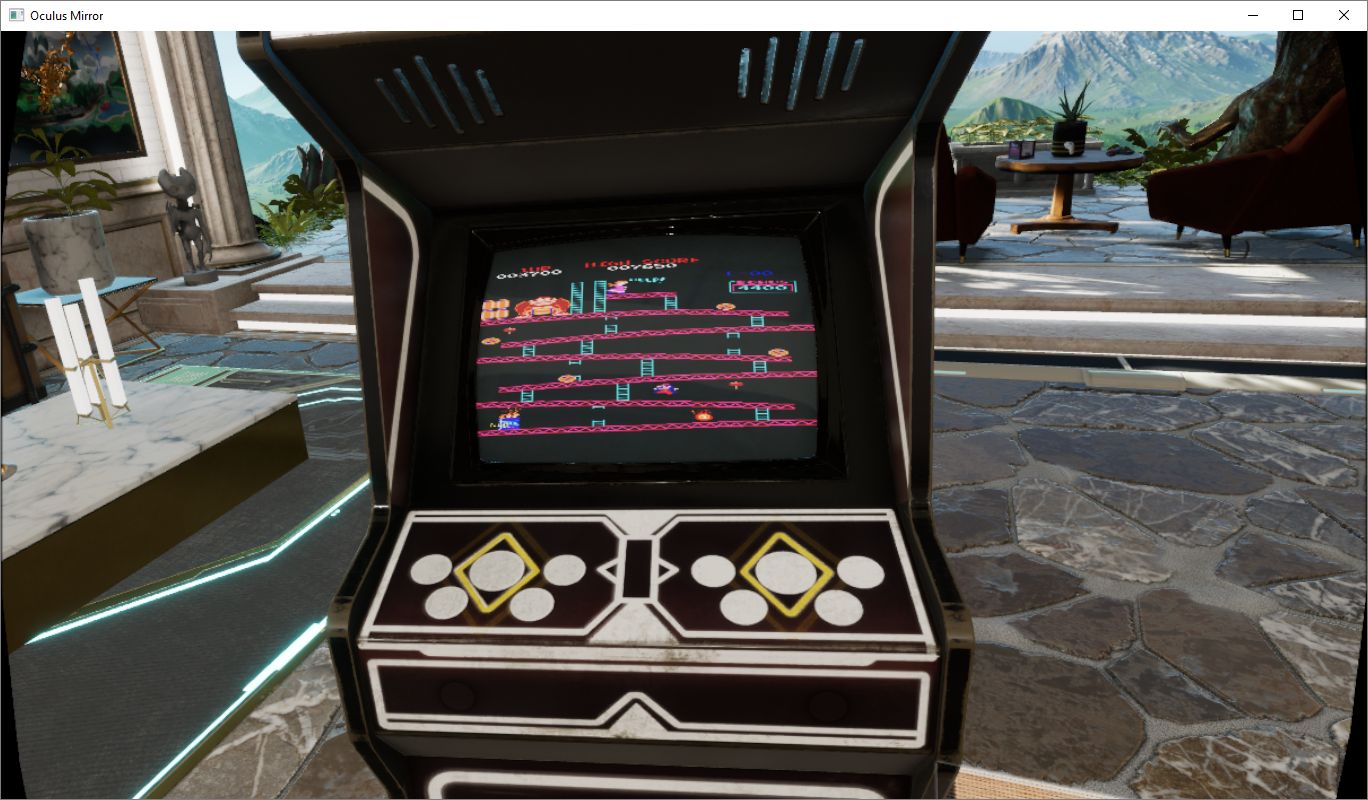
Running MAME in the arcade cabinet
If you’re interested in running PLEX, I have a separate video series on ripping videos and setting up PLEX (part 1 (Ripping), part 2 (PLEX)), and while it’s also not difficult, it’s beyond the scope of this post. Even so, the process of embedding is the same, especially since, as mentioned earlier, PLEX doesn’t show up in the panel selection menu anyhow.
Here’s the video showing four different emulators running on the Virtual TV in Oculus Home, as well as PLEX running a streaming rip of Coco from a network drive, and there is also a wall-mounted TV option along with a computer monitor. It all worked incredibly well, much better than expected.
I am Oculus Rift ready
For the first time in I don’t know how long, I am not attending the Consumer Electronics Show in Las Vegas as I am busy with classes at UC Irvine. I must admit, I’m envious of those who are there, getting to see things like the LG curved, two-sided display panels and the Farady Future 1,000 hp electric car.
As was the case with several recent CESs, a big draw is virtual reality. That is the technology I’ve gone the most berserk over as my previous post indicated, and the new advancements – including redesigned controllers and a front facing camera – in my VR platform of choice, the HTC Vive, are giving me very high hopes. If I could go into hibernation until it arrived, I would.
That being said, industry leader Oculus has made their VR headset, the Rift, available for pre-order at $599. This led to some negative reaction, as there was a belief the consumer-grade version of the Rift would be around the $350 – $400 price point, based on comments made by CEO Palmer Lucky.
I didn’t order one as I’m holding out for the Vive, but we all know early tech is expensive. Plus, the Rift comes with some peripherals including an Xbox One controller and remote, and is packed in a nifty carrying case.
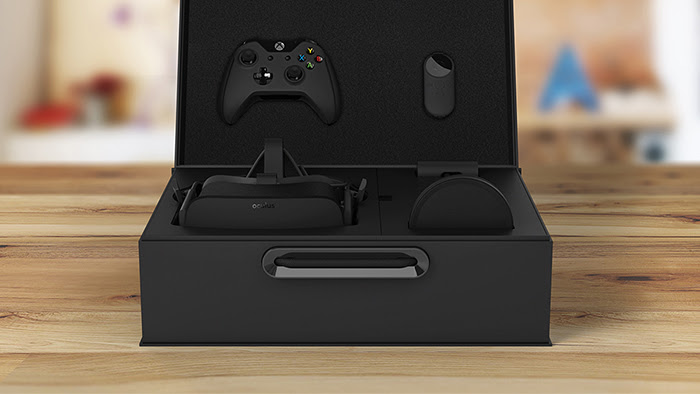
Image Credit: Ars Technica
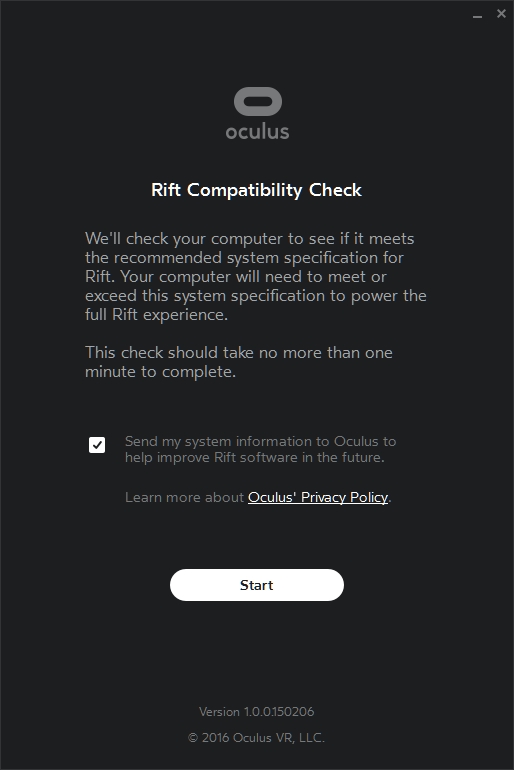
In addition to the headset, you’ll need a pretty decent PC in order to power the dual displays and motion tracking required. Palmer Luckily, Oculus provides a tool you can download (be sure to click the blue ‘download’ button, not the black ‘checkout’ button! Unless you want to order a Rift. In that case, click anything you want) that will test your machine and see if it passes muster for providing a VR experience. It checks memory, GPU, processor, etc. and provides details about each.
And I’m ready! Thank you Oculus for letting me know the Vive will work perfectly!


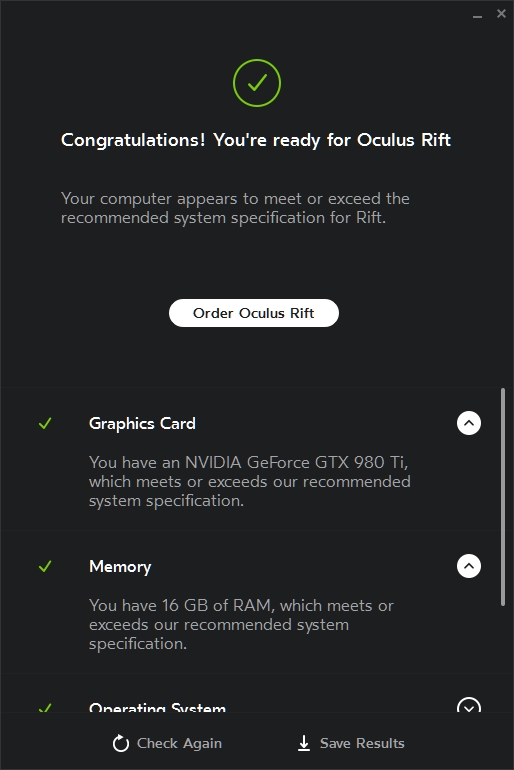
You can get additional details about each component tested
A Life-Changing Experience
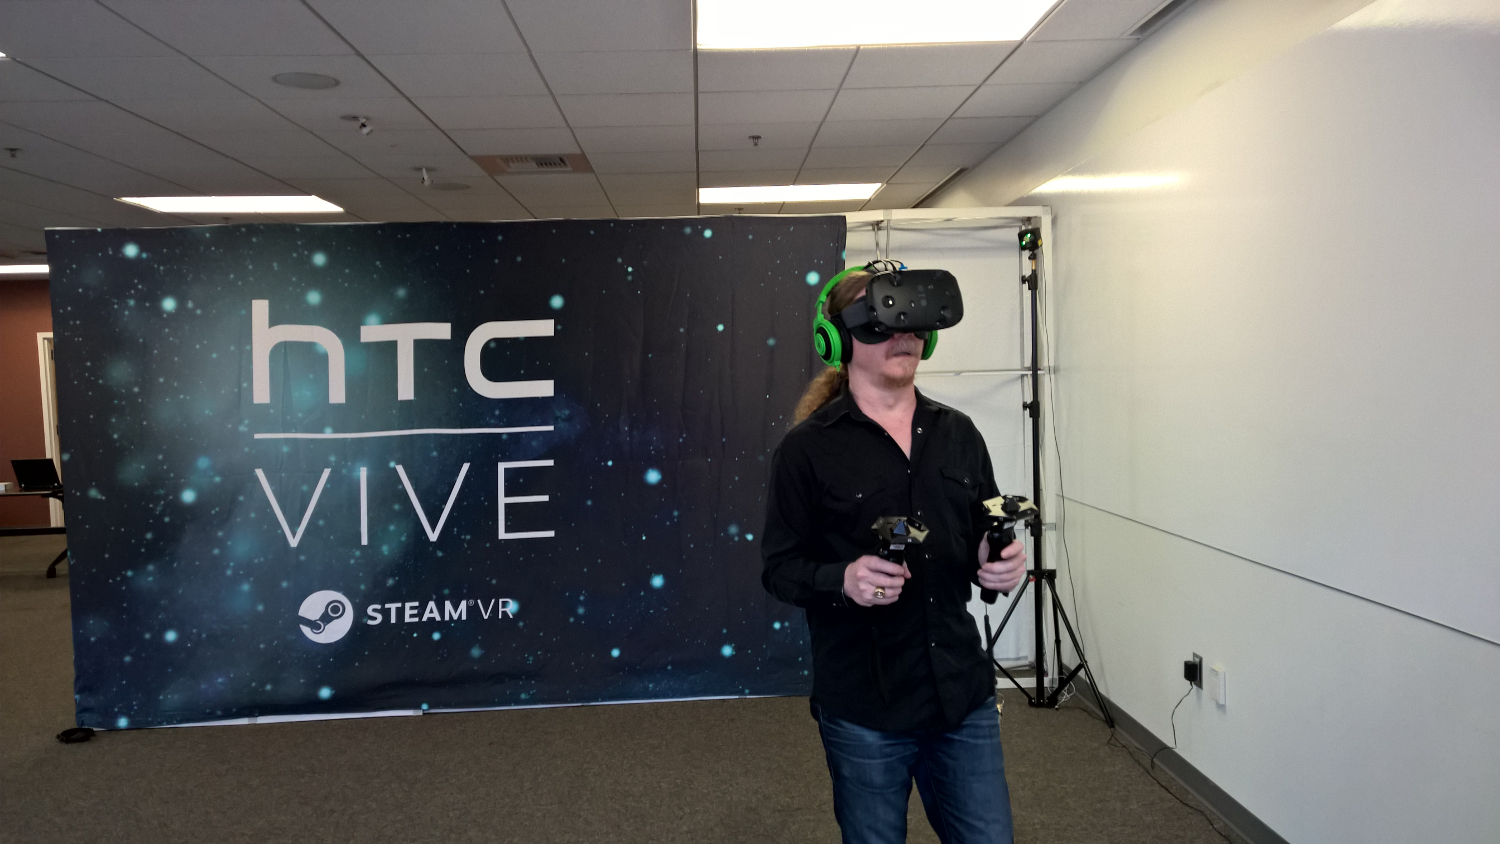
That’s me up there, mouth agape, experiencing the most incredible thing I’ve ever experienced: the HTC Vive VR headset.
I have been hearing about VR for some time now. And I don’t mean all those admirable yet misguided attempts in the 80s and 90s – remember VRML or the woefully under-appreciated Virtual Boy? No, those were far before technology was ready to handle the capabilities, potential and technical requirements of VR, and it clearly showed. But over the last few years, I have heard people who have exclaimed that current virtual reality experiences have to be seen to be believed, and that they are even better than real life.
Come on, now. Let’s all just relax.
At least that’s how I used to respond. However, after experiencing the HTC Vive at a demonstration offered at the University of California, Irvine, I can safely say it has finally arrived. And those people were right, my mouth-agape expression in the header image says it all: the experience was life-changing.
Augmented Reality? Real Reality? I don’t know.

We are suddenly seeing all kinds of alternate ‘realities’ being made possible through technology. The most common of these is the oxymoronic virtual reality, which although an idea for decades (it even had a web language known as VRML that would allow 3-d worlds inside a web browser), now seems as though it might actually be coming to fruition thanks to Sony’s PS4-based Project Morpheus, due in early 2016, HTC/Valve’s PC-based Re Vive which came out of nowhere and is due later this year, and the now-owned-by-Facebook Oculus Rift, due…sometime.